
Is there anything cuter, in all the land, than little baby feet? I just love to pop off little “B’s” socks and peek at those cute little wiggly pigglys. I love her cute little toes! (Well, admittedly I love every little inch of her, but today we are talking hands and feet!) I’ve been itching to do some canvas prints of her little piggy’s and chubby hands! So, I used that excuse to invite my girls over for a morning of crafting! Trust me when I say it takes two grown adults, to one wiggly 6-month-old, to pull this craft off!


The supplies you’ll need for this craft are simple…
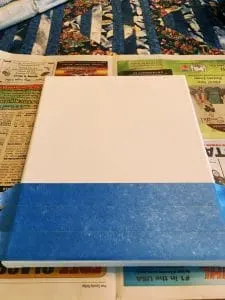
1-2 8×10 white canvas’s, or any size, available at your craft store.
Black, gold, or any color of your choice, acrylic paint
One fine tip paint brush and one stencil brush
Blue masking tape used for painting
A ruler and a pencil

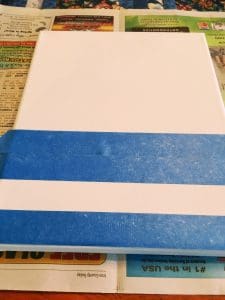

I wanted to do a black and white striped canvas with gold footprints. To make your lines straight, tear one piece of tape off the width of your canvas and lay it straight across the bottom. Next, take another strip of tape and line it right up next to the bottom strip. Then, take a third strip of tape, and place it above the second strip. Exactly like I did in the photo above.
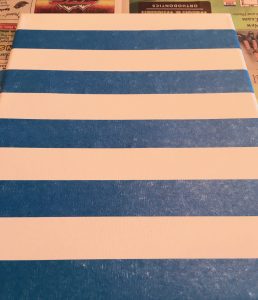
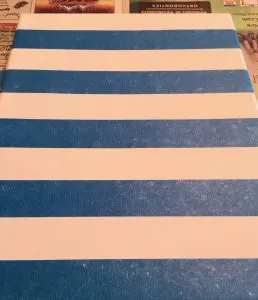
Next, remove the second strip of tape and place it above the third row. See how I’ve created my white stripe which we will be painting black. By doing this we have perfectly even spaced lines, and we don’t have to measure or mark the canvas. We just let the tape do all the hard work for us. Continue the pattern by placing another new strip of tape above the “moving” tape line. Do this all the way up the canvas. Once you are done, discard the measuring strip of tape. Be sure your tape lines are pressed down, so paint won’t seep through. When you are done with your tape your canvas should look like the photo below. Next, cover the outer edges of the canvas with more blue tape so that you won’t get paint along your edges. This just keeps things nice and crisp.

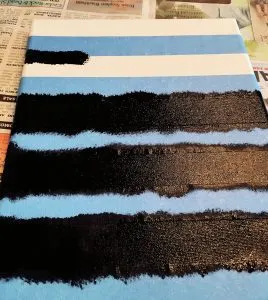
Now the fun part…painting! I like to squeeze my paint out onto a paper plate. It makes clean-up a breeze. Dab your stencil brush into the black paint. On your paper plate, where there is no paint, or on a paper towel, dab the brush a few times to remove any excess paint. Now begin dabbing the paint on the white area’s of the canvas to create your stripes. You may have to let them dry and go over them again. Make sure you have a nice solid black line.
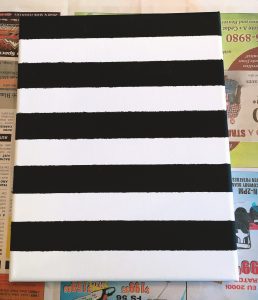

Once you are done and the paint has dried, remove the tape and throw that sticky mess away! Whew! Your canvas should now look like the photo below.
Now for the fun part! (May the force be with you!) You are going to take the little wiggly foot that is attached to your favorite squishy baby, and you are going to paint the bottom of it with your favorite color. I used gold. We had baby “B” on the table, in her bumbo chair, strapped in. Paint the bottom of one foot. (I would only do one foot at a time. Be sure to wash off the completed foot before starting with the other one.) It doesn’t take a ton of paint either. Just a nice light covering on the bottom of their foot. Have one person hold the foot while you bring the canvas up to the heel. Press, starting with the heel, and working towards the toes. (They tend to relax their toes if you work from bottom to top). This is like wrangling an octopus! You have to do this really fast because those piggy’s like to run away. Once one foot is done, do the other.
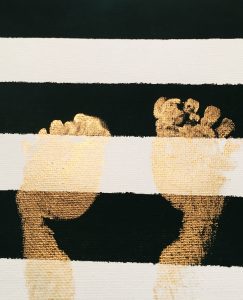


Okay, so we didn’t do to well the first time around. As you can see we ended up with a wonderful smudged mess! That’s okay! You can fix things. I’m a firm believer in fixing things. My fix was to go over the top of the gold with another color.
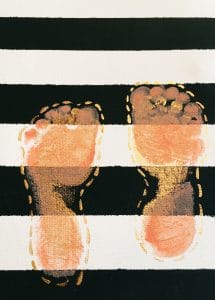
It worked great! Then I just took some gold paint with my fine paint brush and outlined the prints. I wanted them to stand out a little more. You can do whatever you want to do! That’s the wonderful thing about creating! You get to be creative! Once the feet were done I used a pencil to lightly write the wording I wanted on the canvas. With my fine tipped brush I went over my pencil marks with gold paint.
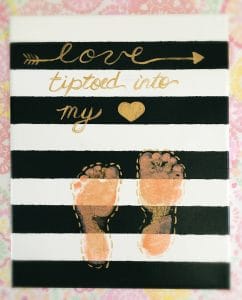
Hooray! Mission accomplished! I absolutely love the way this turned out! A wonderful precious keepsake of our little “B’s” piggy’s! On to our second canvas…
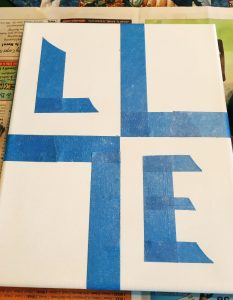

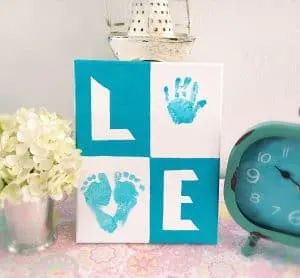
For our second canvas we changed things up just a bit. We measured off four equal sections. The sections that will stay white have tape inside their box so that the lettering boxes have the outer edges. (Was that clear as mud?) I used the tape to create the letters “L” and “E” for the word Love. Once the tape was firmly in place I taped around the outer edges, I used my favorite paint color and stencil painted around the letters. I had to do two coats to completely cover the canvas.

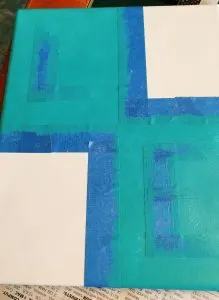
When it dried, we removed the tape, and using the same process as we did for the striped canvas, we did baby “B’s” hand. I can’t lie…that hand print was HARD! Use the same technique as before, and push from the bottom of their hand out to their little fingers. Next we did the feet. You’ll want a “V” shape so be sure to connect at the heels when pressing down. I just used my fine tip brush, white paint, and the ruler to “touch-up” any spots where the paint line wasn’t as crisp as I wanted it.

I now have two cute canvas piggy prints in our nest. I smile every time I see them. This is such a fun and easy craft. I hope you have fun making a print of the cute little piggy’s in your life! If you do, send me a picture. I’d LOVE to see them! Happy crafting!

Grammye
Sunday 31st of October 2021
Really cute craft project. I love those baby feet, too. I know exactly what you mean! These sure look classy. I may attempt it with the next arrival!!
[email protected]
Tuesday 2nd of November 2021
Hi Grammye! Love that Title! You need to try this with the next arrival! Saving those little "Piggies" to look back on is so fun! Thanks for stopping by and visiting. I hope you have a great week! Norine
Nancy Miller
Tuesday 26th of April 2016
Adorable!♡♡
[email protected]
Tuesday 26th of April 2016
Thanks so much! We had a fun time painting those little piggy's!