Homemade Caramel Candy Recipe

Soft, chewy, buttery, Homemade Caramels made with heavy cream are a Family Favorite! They are a Labor of Love, and worth all the extra effort!
Years ago I was reading a fictional “love story” where the main character was a baker. (Ironic, huh?) Throughout the book the author included recipes. At the end of the story the central character made “Labor Of Love Caramels”.
Being the huge soft caramel fan that I am, I wanted to try the recipe and see if they were really as good as the writer had made them out to be. They were! Oh, my heavenly stars…they’re a love story in and of themselves!
A note the author made was “These caramels are wonderful, but very labor-intensive. You need time and a strong arm – or someone to spell you off on the stirring!” (I recommend Super Man…but you could go with Thor!)
That was not a fictional statement! They are a labor of love, but anything worth making generally is! (9 long months of pregnancy comes to mind!)
This is a very EASY Homemade Caramel Recipe, but they do require a LOT of stirring to reach the required “firm ball” temperature of 232°. So pull up a stool, do a few stretches, and get ready to make the BEST soft caramels EVER!
Ingredients needed for Classic Homemade Caramel Candy
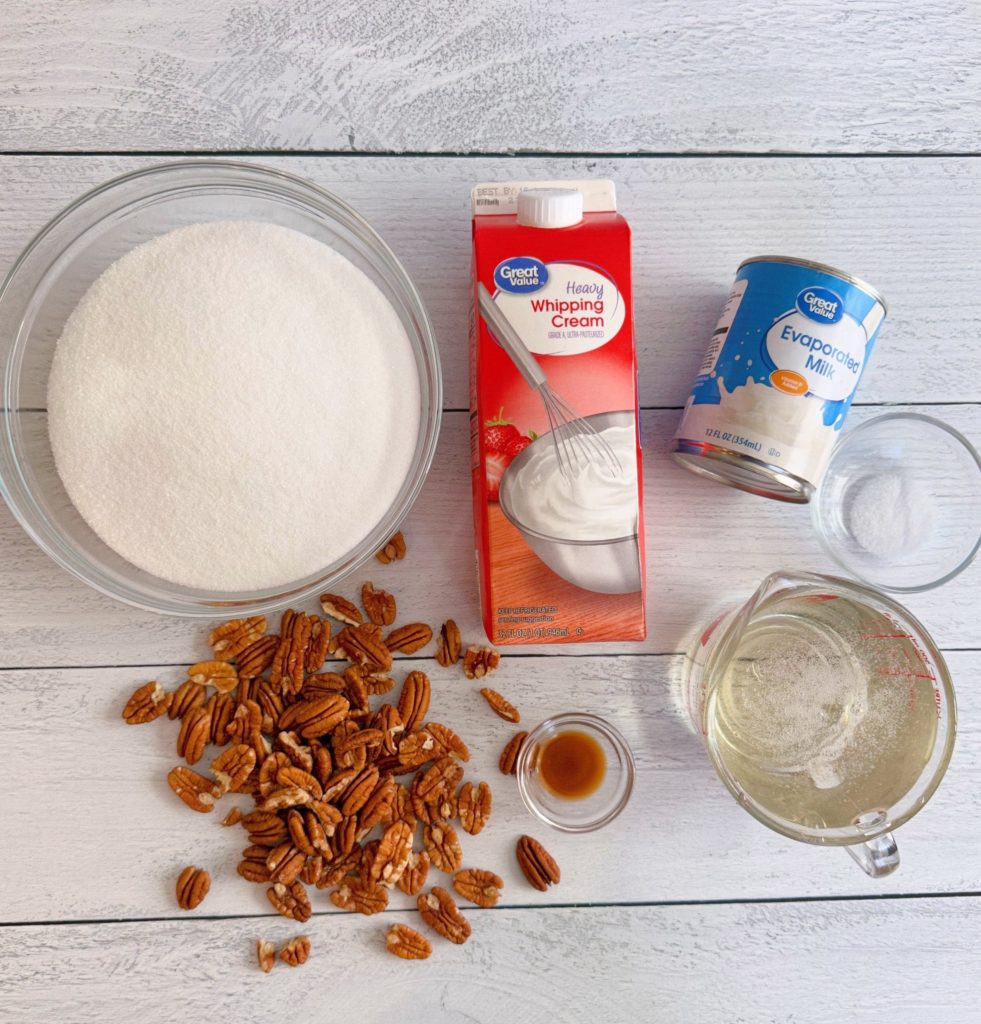
- 4 Cups of Granulated Sugar – no one said this was a sugar-free treat!
- 2 Cups White Corn Syrup – Not all Corn Syrup is created equal! Be sure to purchase a top name brand.
- ½ teaspoon salt
- 1 can evaporated milk – Note THIS recipe uses evaporated milk rather than sweetened condensed milk.
- 1 Quart Heavy Whipping Cream
- 1 teaspoon vanilla
- 1 Cup Chopped Nuts (optional) – I divide the recipe in half and do half without nuts and the other half traditional plain caramel. I recommend pecans or walnuts.
Specific Tools you’ll need for Homemade Caramel making
- Parchment paper
- Non-stick cooking spray
- One large, non-stick, half-sheet baking sheet, or if splitting the batch for nuts, two smaller 9×6, quarter-sheet non-stick baking pans about 1 inch deep.
- 1 digital thermometer
- 4 x 4-inch squares of wax paper, or cellophane candy wrappers.
How To Make Homemade Caramels
Before beginning, I want to caution that this recipe, like many candy recipes, reaches extremely HIGH TEMPERATURES! If not handled properly, it may result in injury! PLEASE use EVERY precaution when preparing this recipe.
Make sure your pot is on the back burners where they can not tip over and land on those cooking. CHILDREN and PETS SHOULD NEVER BE around the stove when making candies that require the recipe to reach a “rolling boil”.
NOTE: This recipe will make about 220 wrapped caramels. You will need a large deep 10-quart pot to make this recipe as it will come to a rolling boil and expand during cooking.
Preparation…
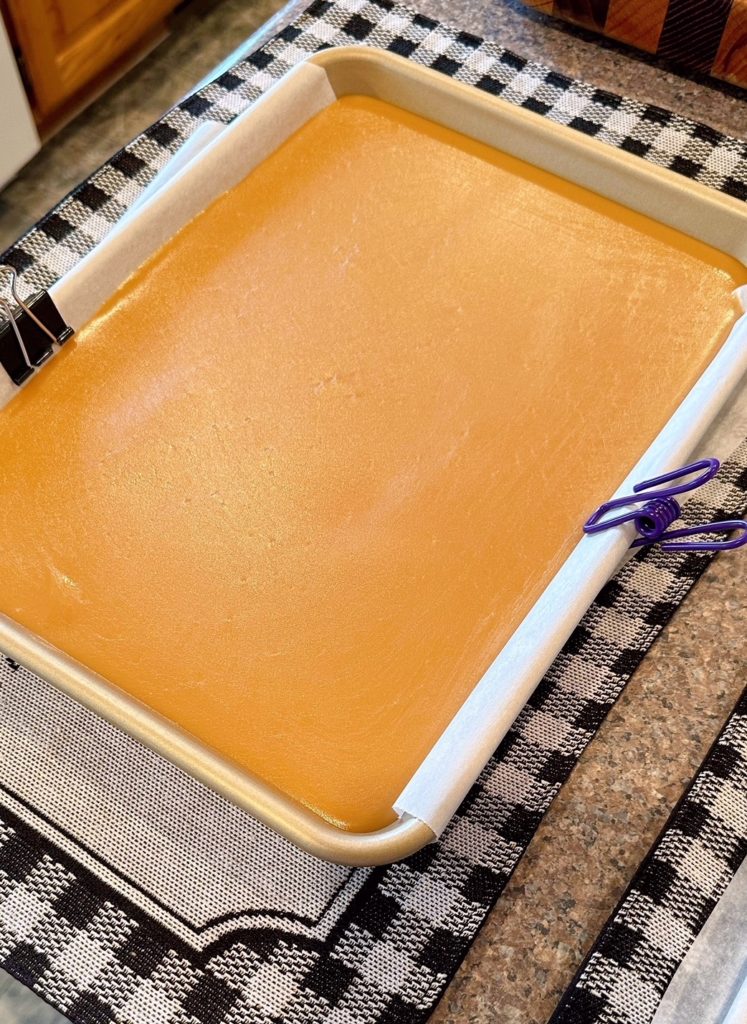
Is key to this recipe! You need to have your baking sheet or sheets sprayed with non-stick cooking spray and lined with parchment paper. It seems redundant to do both…just trust me on this. I also recommend clipping the parchment paper to the side of the pan.
Have all your ingredients measured out and ready to go! You do not have time to stop and grab them during the process. Why? Because you’re stirring!
Step 1:
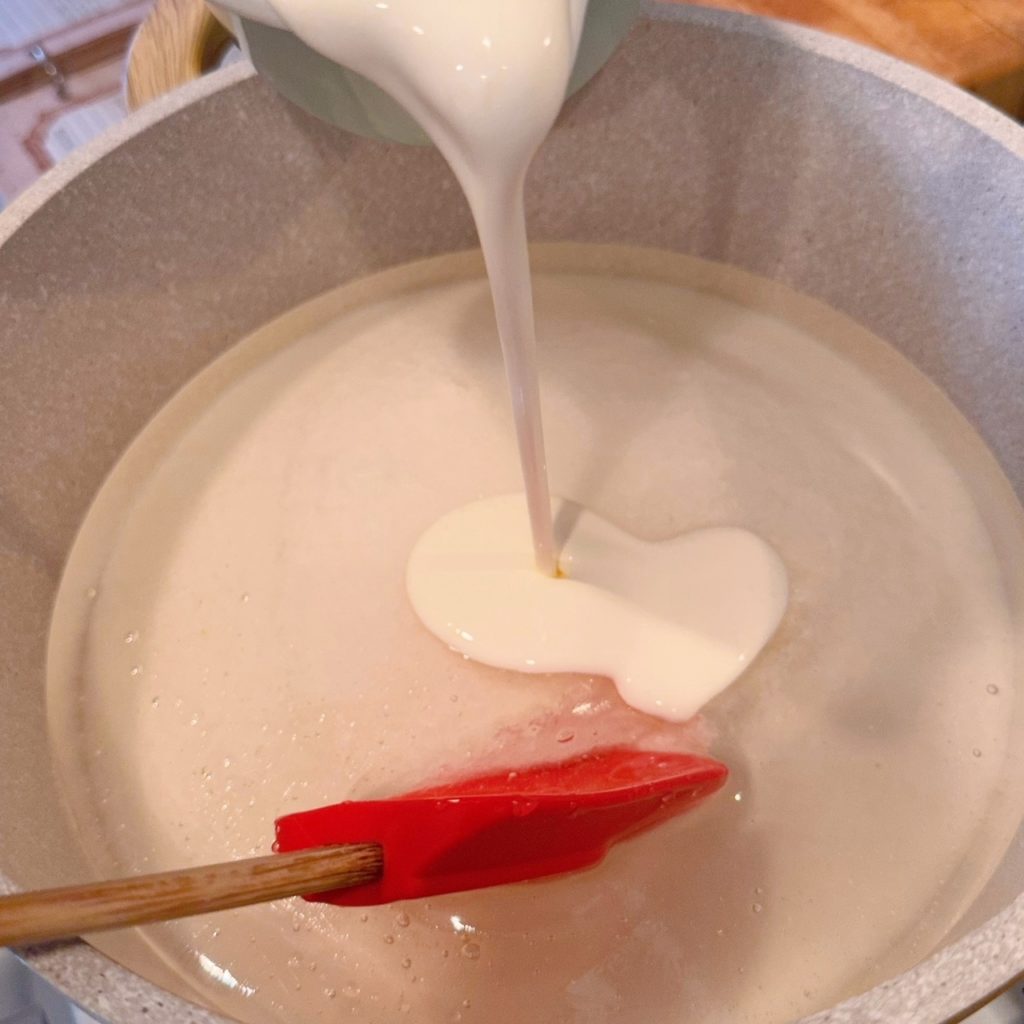
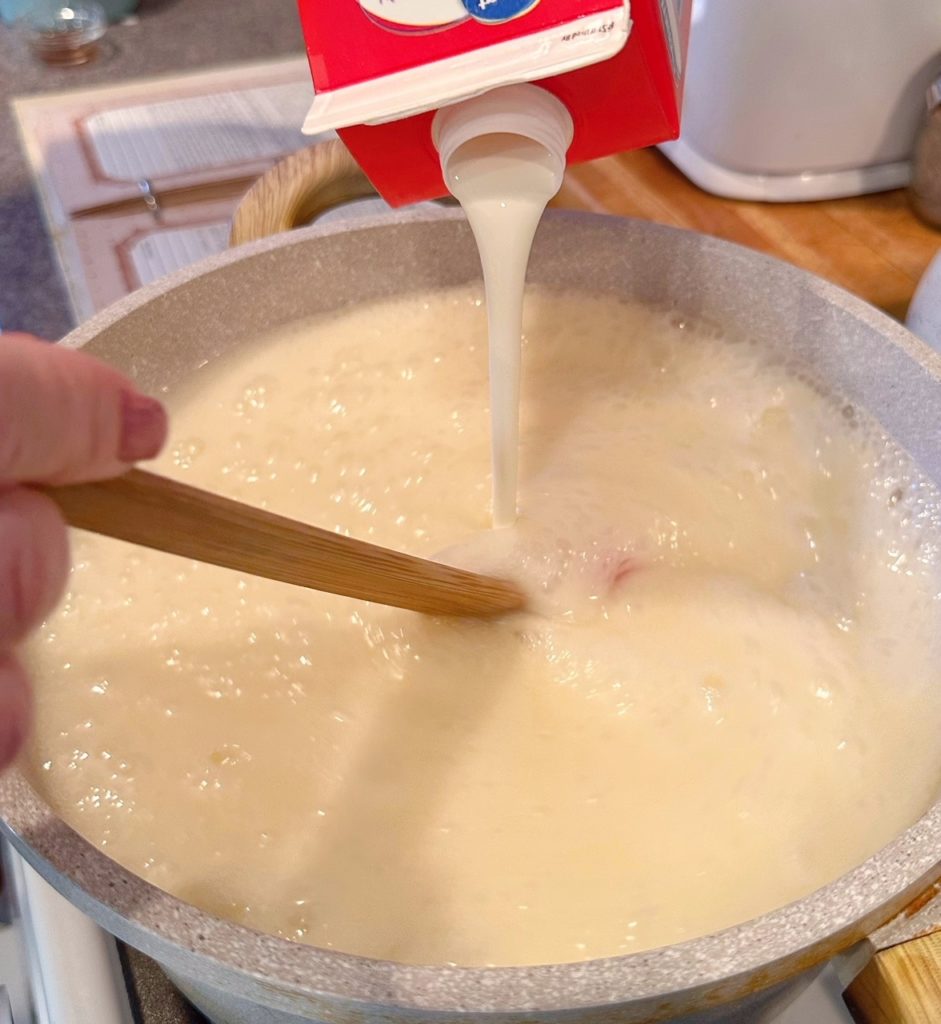
In a large deep 10-quart pot… Combine the sugar, salt, corn syrup, and 2 cups of the cream. Slowly bring to a boil over medium heat, stirring constantly! (You’re gonna hate hearing me say this! Lol)
Step 2:
After the mixture comes to a good rolling boil, slowly add the remaining 2 cups of heavy whipping cream. Do not let the mixture stop boiling.
What’s a “Rolling Boil”? A “Rolling Boil” is what happens when a liquid reaches about 212° and the bubbles are smaller and continuous in motion. It’s a boil that generally won’t slow down when stirred.
Step 3:
Continue to stir…and allow the mixture to cook until it starts to thicken. Don’t you dare stop stirring! You will notice a change in the texture of the mixture. It will have the consistency of gravy.
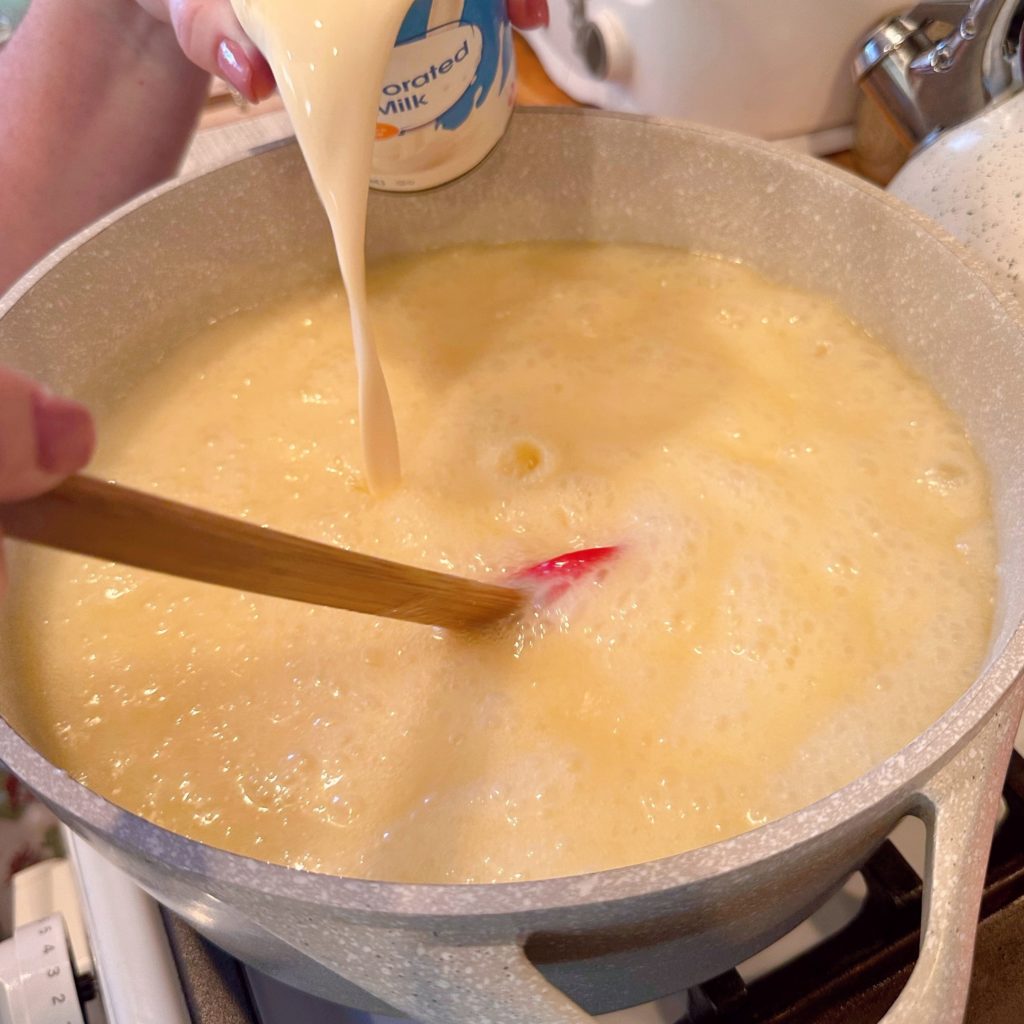
Slowly add evaporated milk. Please be careful! This mixture is so HOT!
Step 4:
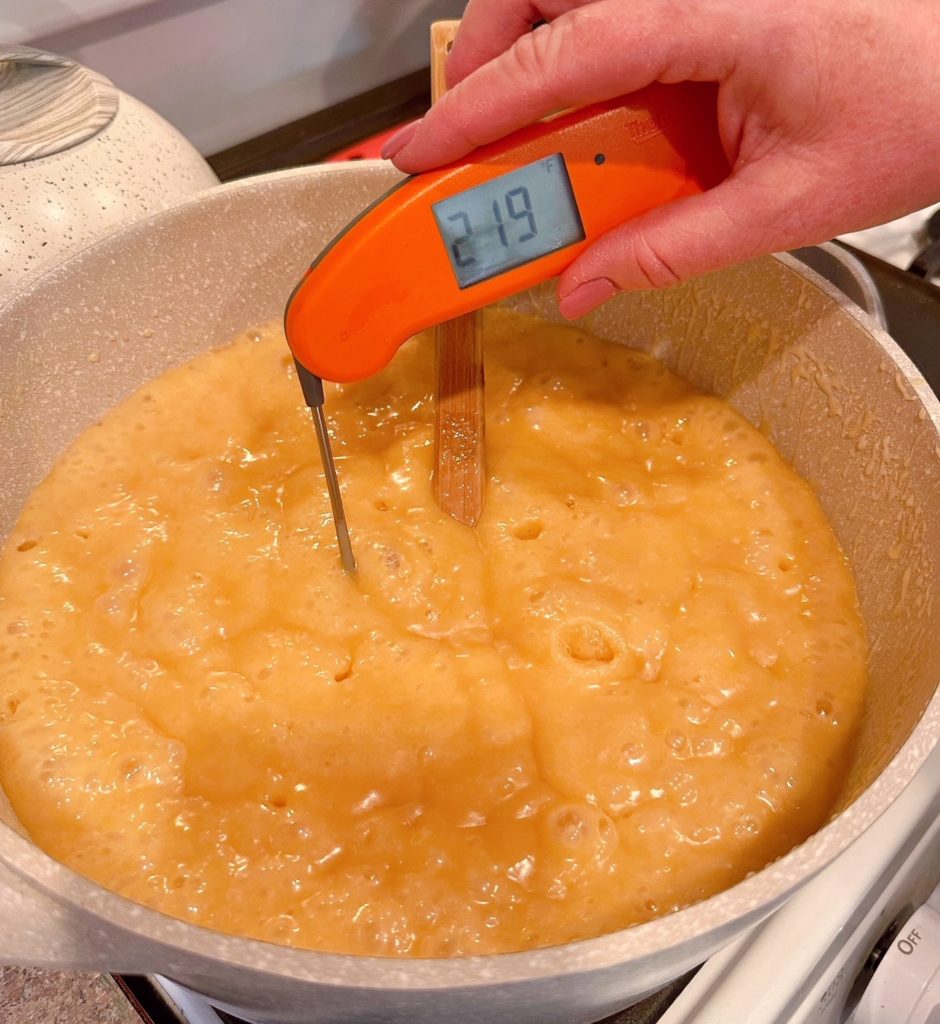
Now for the fun part! Continue stirring until the mixture reaches the temps of the depths of Hell…or 232°. (All I can say is this is a winter treat for a reason!)
This is the “firm ball” stage! Sometimes it can take at least 40 minutes to hit this temperature! It took me almost an hour, but I resisted the urge to turn the temperature up.
TIP: Please note caramel can burn if it is cooked at too high a temperature.
Check the caramel often with the digital or candy thermometer. You will begin to think that it is never going to hit 232°…but it will…finally and all of a sudden!
Step 5:
Once the caramel has reached the temperature of 232 °F turn the heat off (stop cursing…you’re almost done!). Add vanilla. Stir.
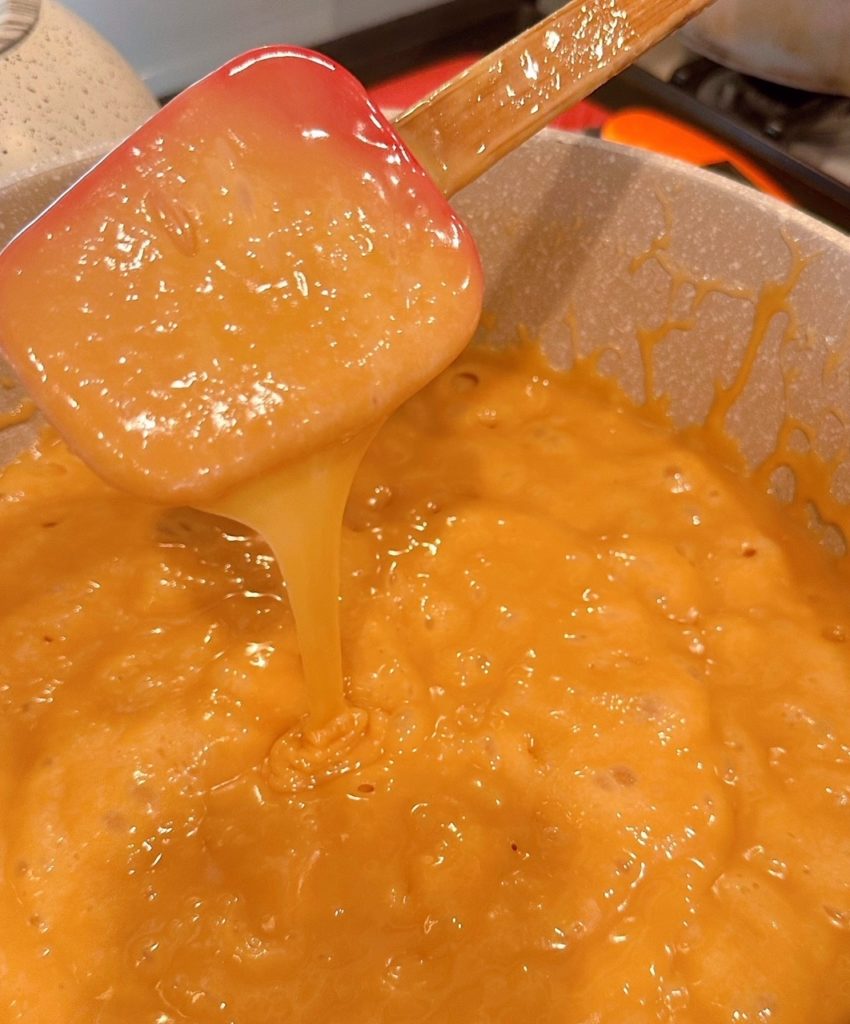
Look at that beautiful golden caramel! DO NOT TOUCH IT!!! See those bubbles…it’s HOT! This is why I say it’s not a recipe to make with children around or pets! (Husbands are questionable!)
Carefully…very carefully… Pour into greased parchment-lined pans and let stand until firm.
You want them completely cool! Note: I’ve set place mats under my pans to protect my counter tops from the heat! It will take time for that caramel to cool to room temp. They need to set-up for at least 6 hours.
Tip: I like to leave mine out overnight and then cut and wrap them the next day.
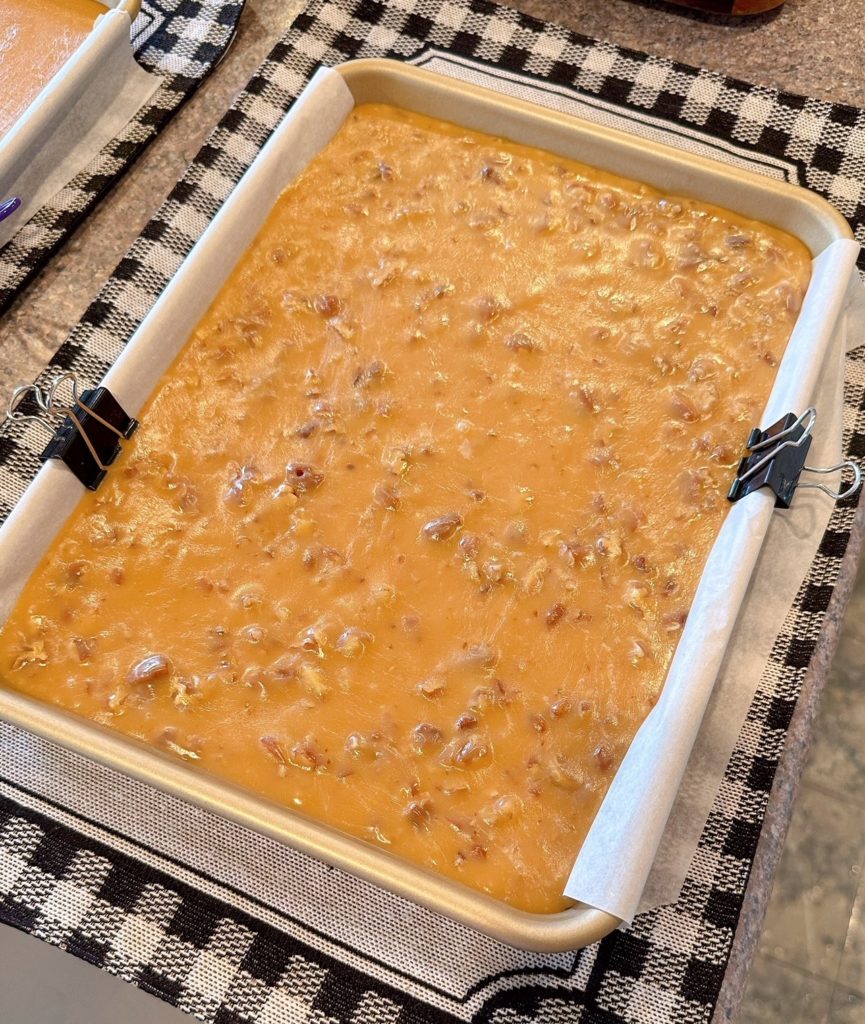
If doing half with nuts and half without, like I do, pour the plain caramel first into the prepared pan.
Add the chopped nuts to the remaining caramel and stir to combine. Pour into your second prepared pan. This pan will look fuller, it’s just the added volume of the nuts.
Cutting Homemade Caramels
Run a sharp knife along the edge that doesn’t have parchment paper. Unclip the paper from the sides of the baking sheet.
Grab the edges of the parchment paper and slowly lift upwards until the caramel sheet pops out of the pan.
Lay caramel-filled parchment on a cutting board. Using a sharp knife, cut caramel into ¾-inch slices both vertically and horizontally to create squares.

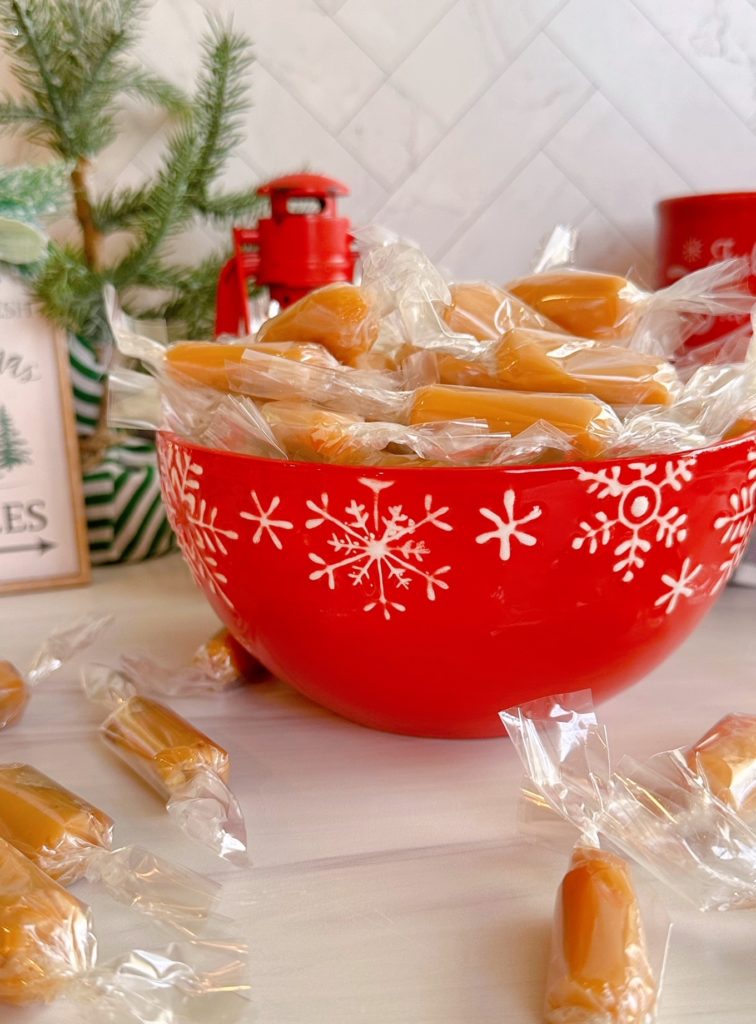
Wrapping Homemade Caramels and Storage
If you can find a friend to help you with the wrapping… I recommend it! It takes time wrapping hundreds of caramels. Perhaps it’s a good time to watch your favorite Christmas movie!
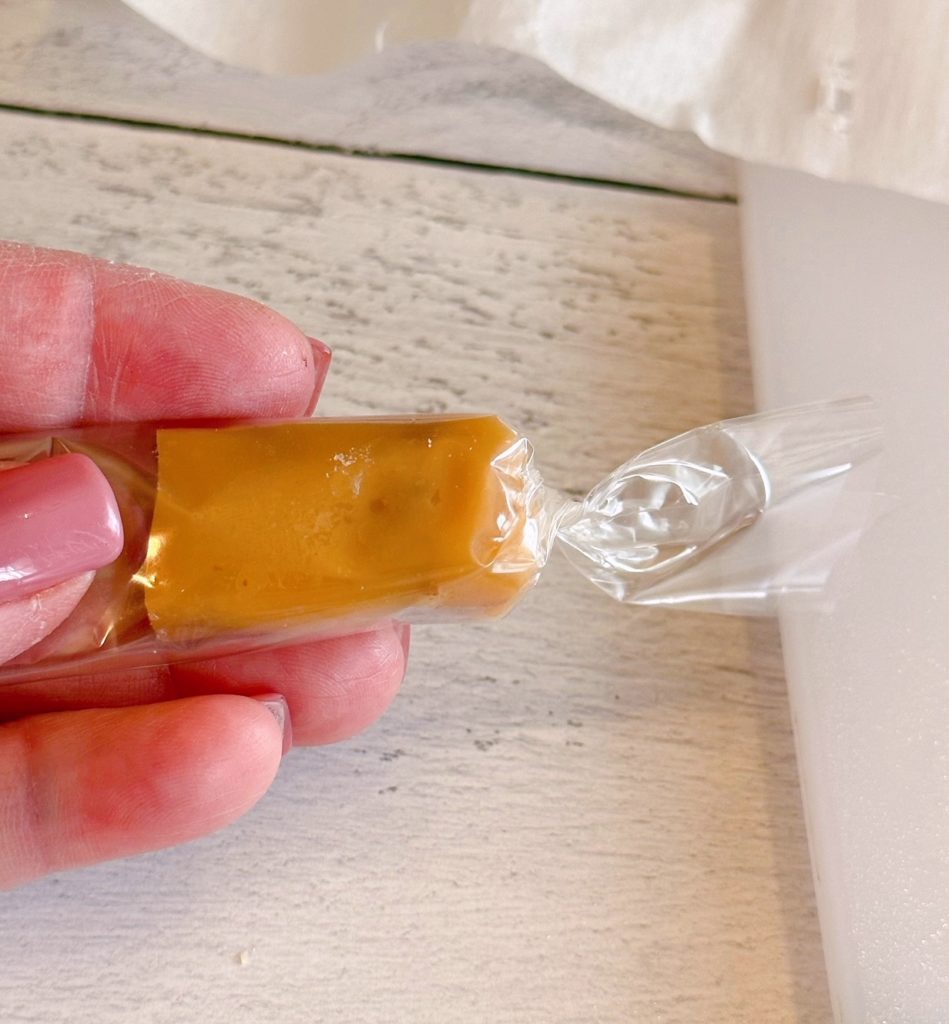
Using pre-cut 4″ x 4″ wax paper squares, or cellophane candy wrappers, place the cut caramel in the center of the paper at one end and roll to the other end.
Twist the ends with three turns. I’ve found three twists hold the ends closed perfectly.
TIP: Bring a damp washcloth to the table where you’re wrapping the caramels to dab your sticky fingers on during the wrapping process, so you aren’t tempted to “lick” your fingers! Let’s not share too much this holiday season!
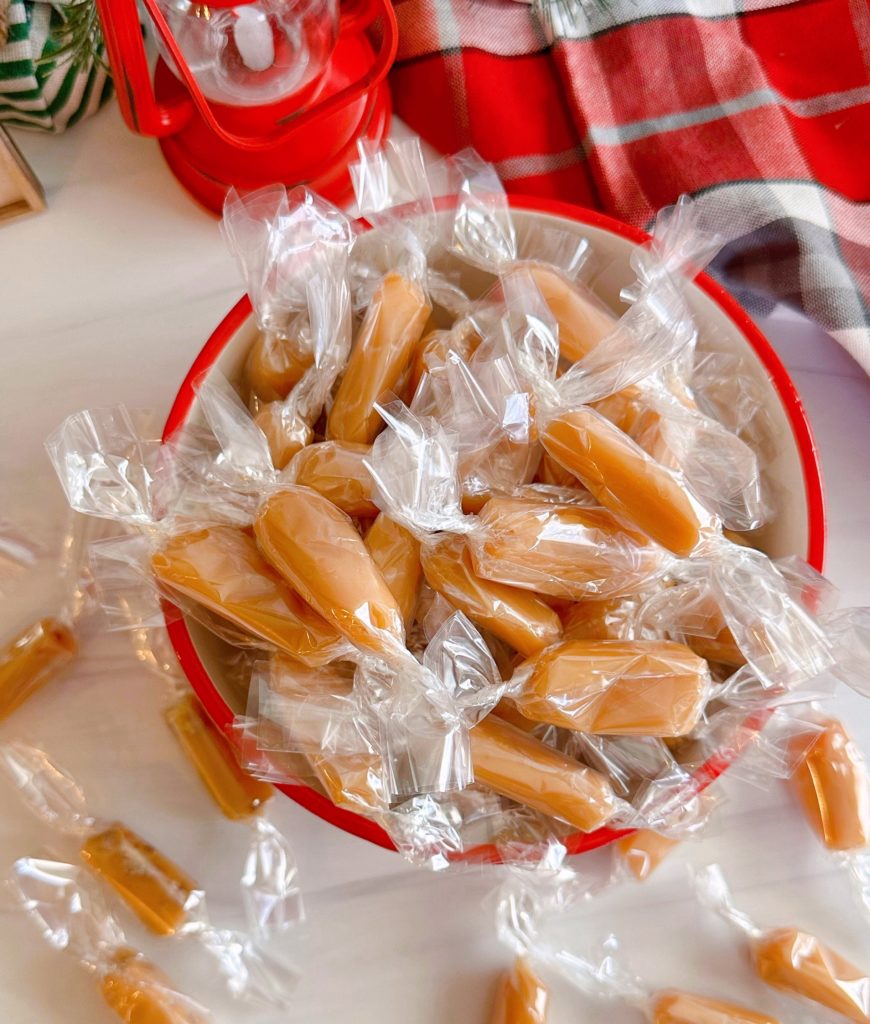
As mentioned above, this will make about 220 total caramel candies! Store in several large gallon-sized Ziploc bags until ready to eat or share with others.
They will hold 6–9 months once wrapped up tight!
Traditional Caramel is rich, creamy, and buttery! I love how soft and chewy these caramels are. Only one word comes to mind…PERFECTION! Most Homemade Caramel Recipes are made with Sweetened Condensed Milk, which adds even more sugar to the caramels.
This recipe allows the “buttery caramel” flavors to shine!
I’m a huge fan of pecan caramels! What can I say…I’m a nuts and chewy girl!
You can even dip these caramels in chocolate for an extra special holiday treat! Add a little sea salt on top, and you have the most amazing Homemade Salted Caramels!
Frequently Asked Questions and Answers
- Why did my caramels turn hard? Temperature! This is why I stress keeping the heat at medium throughout the cooking process and to check often with a digital thermometer!
- Should I use a digital thermometer or a candy thermometer? The newer thermometers are much more accurate than the old glass candy thermometers. Once you go over the temp of 232° you start to enter the “hard crack” stage! You’re now making toffee rather than caramel!
- How long will my homemade caramels last? Homemade caramel doesn’t need to be refrigerated. As long as they are wrapped, they will last 6–9 months.
- How do I prevent my caramels from crystallizing? It’s all about the acid! Making caramels is like doing an at-home science project. The cream, and the evaporated milk, add acid and help keep the caramels creamy! You can also add a squeeze of lemon juice.
- What is the difference between sweetened condensed milk and evaporated milk in caramels? Both contain sugar. However, sweetened condensed milk has more sugar and gives a sweeter taste to the caramels. The condensed milk will still give you a “caramel” flavor but is a creamier flavor and not overly sweet.
Other Favorite Holiday Candy Recipes
- Crock Pot Peanut Clusters
- English Toffee Almond Roca
- Rolo Pretzel Turtle Bites
- Old Fashioned Peanut Butter Balls from Julia’s Simply Southern
Thanks for stopping by today! I hope you’ll take time this Holiday Season to make one of my all-time favorite treats with these Soft Homemade Caramels! They make great neighbor gifts too.
Happy Holidays!

Printable Recipe

Homemade Caramel Candy Recipe
Ingredients
- 4 Cups Sugar
- ½ teaspoon salt
- 2 Cups White Corn Syrup
- 1 Quart Heavy Whipping Cream
- 1 can Evaporated milk
- 1 teaspoon vanilla extract
- 1 Cup Chopped Nuts Optional
Instructions
- Use caution when making this recipe as the mixture is VERY hot during cooking.
- Spray one half-sheet baking sheet or two quarter-sheets (9×6) baking sheets if dividing the caramel into nuts and plain. Line each baking sheet with parchment paper that hangs over the long edge of the baking sheet by 1-2 inches. Clip parchment paper to the sides of the pan to hold in place. Set aside.
- In a large 10 Quart stock pot, mix sugar, corn syrup, salt, and 2 cups of the heavy whipping cream. Slowly bring to a rolling boil over medium heat, stirring constantly.
- After the mixture comes to a steady rolling boil, slowly add the other half of the heavy whipping cream. Making sure the mixture does not stop boiling.
- Cook the mixture over medium heat, until it begins to thicken, stirring constantly. Note mixture is still light yellow in color. That is normal.
- Slowly add the evaporated milk. Continue stirring until caramel reaches the temperature of 232°F on a digital thermometer, which is firm ball temperature. Note this can take 40-50 minutes. Mixture will turn a beautiful caramel color during cooking.
- Turn off heat. Add vanilla. Carefully Pour caramel into prepared pan. Spread evenly. Let stand until firm. about 5-6 six hour or overnight. Note if dividing the recipe in half to add nuts, add after pouring first half of caramel in quarter-sheet pan. Add chopped nuts to the remaining caramel and pour in other prepared 9×6 inch pan.
- Cut into 3/4 inch squares and roll in wax paper or cellophane candy wrappers 4" x 4" is the perfect size.
Video
Nutrition
About the Author

Meet the Author
Hi! I’m Norine, the cook, baker, and recipe creator behind Norine’s Nest. I love sharing and creating recipes that invite family, friends, and neighbors to gather around the dinner table. Sharing good food and creating memories with those we love brings me happiness. Thanks for stopping by my Nest!