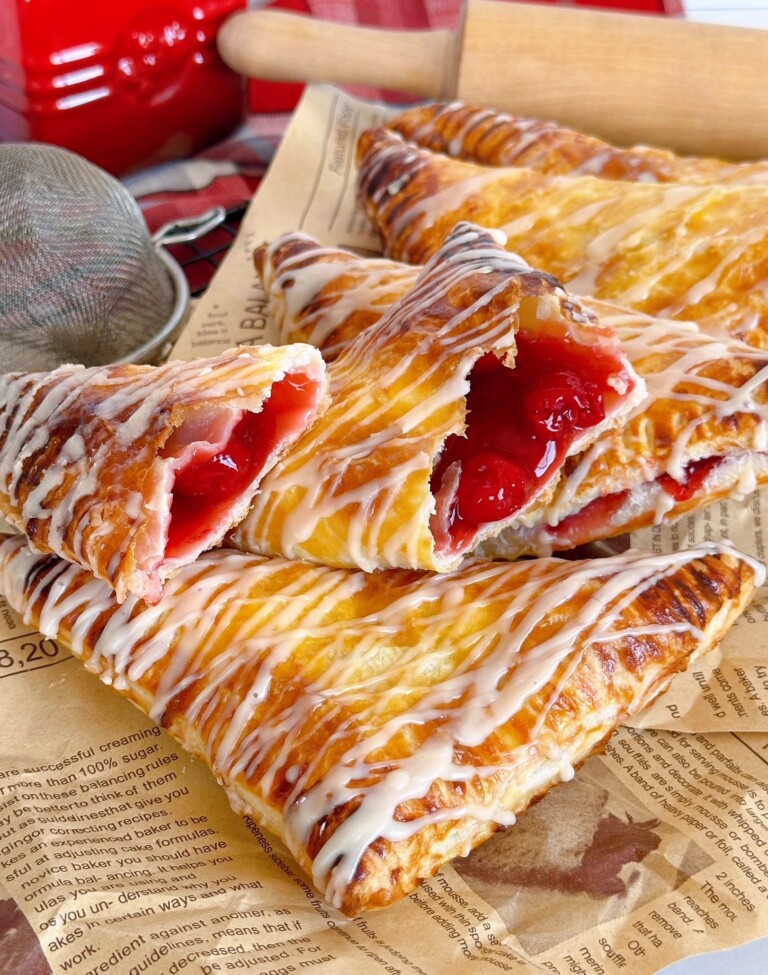
Homemade Fried Peach Hand Pies

Fried Hand Pies are a classic southern treat! Fresh Peaches with a hint of cinnamon inside a super tender flaky homemade pie crust, fried, and sprinkled with cinnamon sugar. The BEST hand pie recipe you’ll ever need!
I’ve been following this wonderful young man over on Instagram. (landontroymcafee…go follow him on Instagram!) Landon’s a college student who did a complete make-over of his Air Stream.
It’s absolutely beautiful! Makes me want to own an Air Stream trailer. I love his decorating taste and want to have him come redo my Nest for me!
Anywho… He was home for the summer and kept posting stories of his Saturday morning trips to the Farmer’s Market in beautiful rural Tennessee. Every time, I think just to taunt me…lol, he’d buy a Fried Hand Pie!
I was swooning and drooling… all at the same time (People think I can’t multitask… Ha!). Not to whine…but I wanted a fruit hand pie too! I mean… is there anything better in the summer than a handheld fruit pie? I think not.
A few weeks ago I had a big box of ripe peaches I could hear them calling out to me “Make us into a Fresh Peach Hand Pie! Like Landon is always taunting you with!”
Not one to let a box of peaches down… I got to work and whipped up my very first batch of fried peach hand pies. I think I did the South Proud!
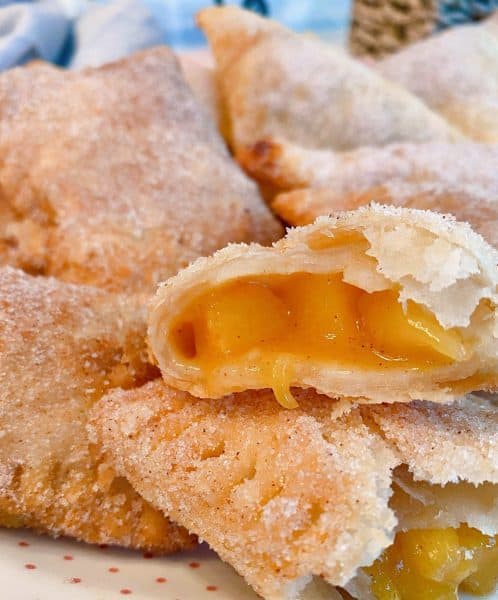
Wow! I mean WOW!! I personally think this is the BEST pocket of peach happiness on the planet! They’re lip-smacking good!
How to Make Individual Homemade Fried Hand Peach Pies
Here’s the beauty of this recipe. These are “fried” hand pies, but if you don’t want to fry them, you can bake them in the oven! Baking them would make them more of a Peach Turnover, but they’ll still be tasty.
I do have to admit though…frying them takes these little peach pockets to a whole new level. They’ll be golden and crispy on the outside, with layers of melt in your mouth flakiness, and filled with the freshest most delicious peach filling. All those elements combine for an amazing taste treat.
Begin by making the peach filling. You’ll need 4-5 fresh freestone peaches.
What are Freestone Peaches? Great question! Freestone peaches just mean that the fruit will pull away from the pit.
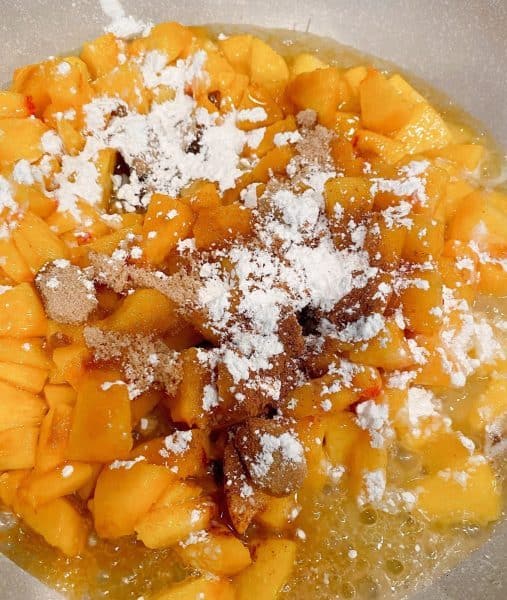
Peel and cut up the peaches into bite size chunks.
In a large skillet over medium high heat melt 1/4 cup of butter. Add all the diced peaches, 1/4 cup brown sugar, 1/2 teaspoon cinnamon, 1/2 teaspoon lemon juice, sprinkle 3-4 tablespoon cornstarch over the top. Stir until well combined. The more cornstarch you add the thicker the filling. It’s best to start with three and go up to four if needed.
TIP: The lemon juice helps to keep the peaches from turning brown.
Stirring constantly bring peach mixture to a boil. Continue stirring until the mixture begins to thicken. The peaches will be tender but not mushy!
TIP: Do not overcook the peaches. The filling will continue to thicken as it cools.
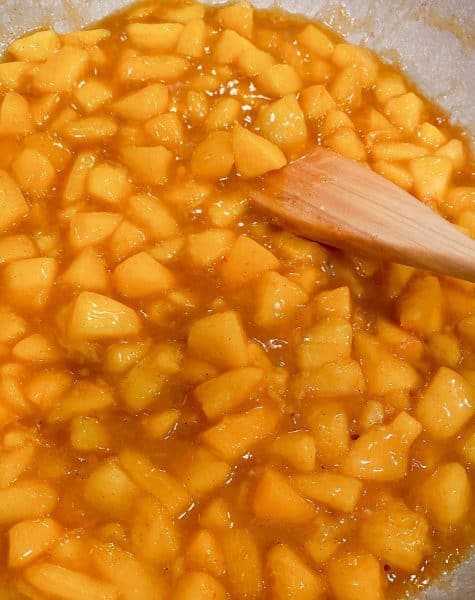
Remove peaches from the stove top, and let it cool. While the filling cools it is the perfect time to make the pie crust.
How to Make Homemade Hand Pie Crust
This is my usual pie crust with one change, instead of water, I add evaporated milk. The makes a slightly thicker, sturdier crust that is easier to handle and work with. It also makes an exceptionally flaky layered crust.
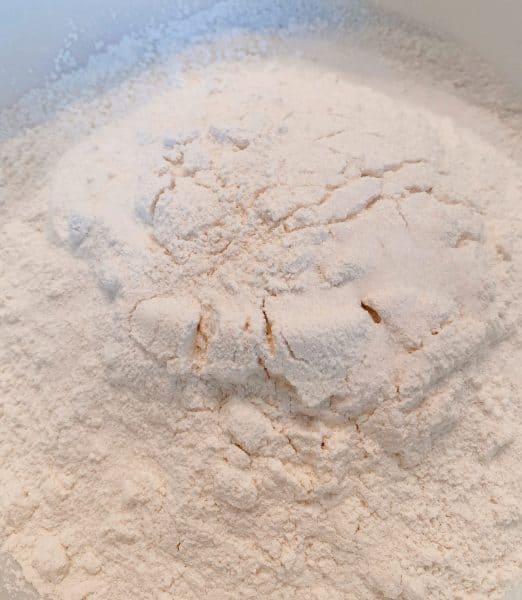
In a large bowl, add 3 cups of all-purpose flour, 1 1/2 teaspoon salt, and 1 cup plus 3 Tablespoons of Crisco Shortening.
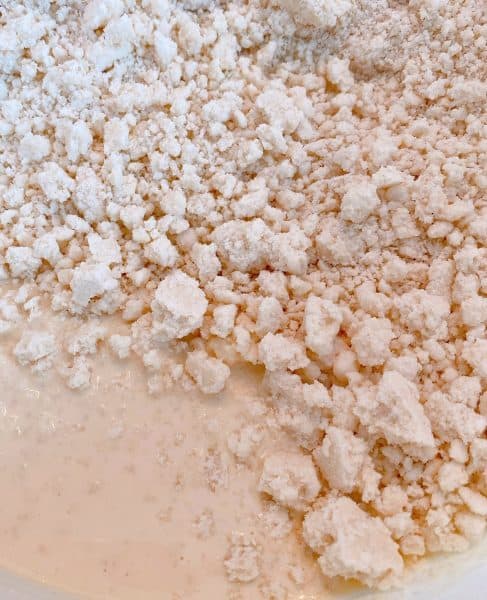
Cut shortening into dry ingredients until small pea size crumbs form. Add 10–11 Tablespoons of Evaporated Milk. Shake the bowl back and forth until a large ball begins to form. Using your fingers gather the remaining ingredients into the ball. Divide the ball in half to create two separate balls of dough.
If you’re unsure how to do this, you can check out my Post for Homemade Flaky Pie Crust and watch the instructional video. It’s filled with helpful tips on how to mix the crust, roll out the dough, and more.
TIP: You can chill the dough if you feel you need to, I don’t. I find it easy to work with when I use my “dough disc” and flour my rolling pin. A link on where to purchase a dough disc is in the recipe card below. I am an amazon affiliate, so I make a small commission, at no cost to you, on items you purchase.
On a well floured surface, roll one of the large pie crusts balls into a large rectangular shape. Make sure the dough is about 1/4 inch thick, maybe a tad thinner. About 12 inches by 9 inches. Be careful not to roll the dough too thin! Remember these are “hand pies” and will be held, so we want the dough a tad thicker than you would for a standard pie crust.
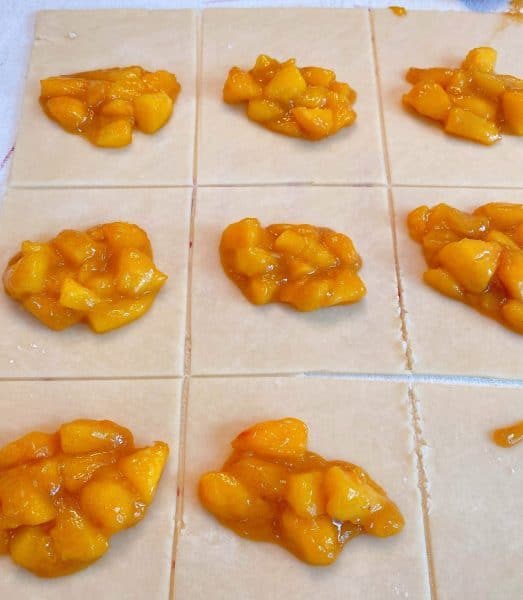
Using a sharp knife cut the rectangle into 9 individual smaller rectangles. About 4 inches long and 3 inches wide. Three across and three down.
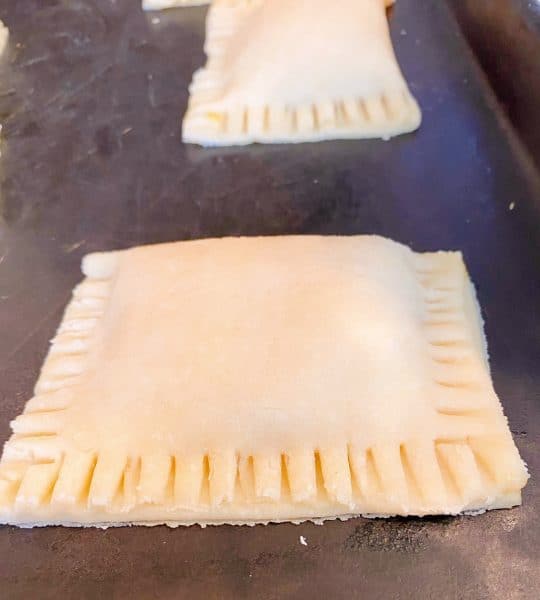
Place 1 Large tablespoon of peach pie filling in the center of each individual rectangle. Brush the edges with evaporated milk. Fold one end of the pie crust over the filling to the other end. Press along the edges with your finger and then use a fork to press the edges of the crusts together.
Place the prepared hand pies on a baking sheet. Continue making all the hand pies until all of them are made and ready to fry. You won’t have time to stop during frying to make more hand pies.
In a heavy medium sauce pan add enough oil to have it two inches deep. Over medium high heat oil to 350°. Be sure to use a thermometer to check the temp often during frying. If the oil is too hot the pies will burn.
PLEASE…ALWAYS USE CAUTION with working with HOT OIL! Place the pan handle towards the back of the stove, so it can’t be accidentally knocked off.
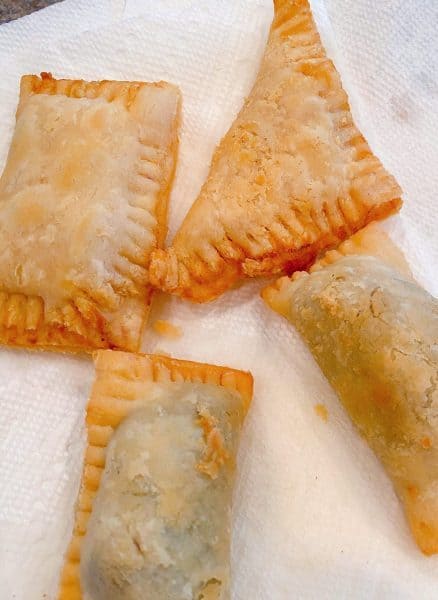
Line a baking rack with 3–4 layers of paper towels, keep the baking rack near where you are frying the hand pies.
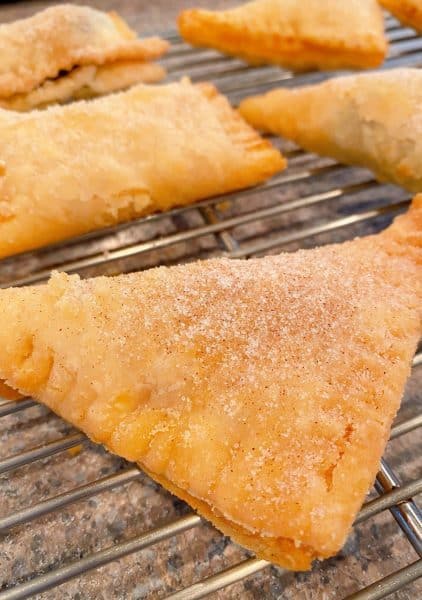
In a medium bowl, or shallow pie plate, mix 1 cup of sugar with 2 teaspoons of cinnamon. Mix well and set aside.
Once your oil is heated to 350° place a hand pie on a frying spatula and carefully place in hot oil. The hand pie will slide off the spatula once it begins to fry. The hand pie will sink to the bottom of the pan and then float up to the surface.
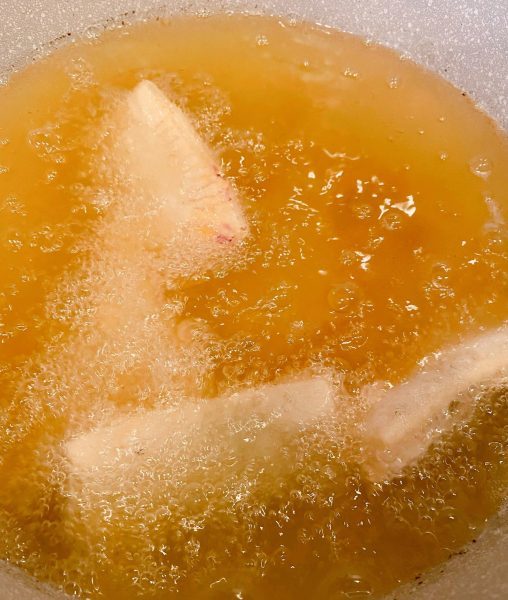
Cook 1–2 minutes, or until the crust is golden brown. Carefully, using the spatula, turn the hand pie over to cook the other side 1–2 minutes. Using the slotted spatula remove the hand pies and place them on the lined baking rack.
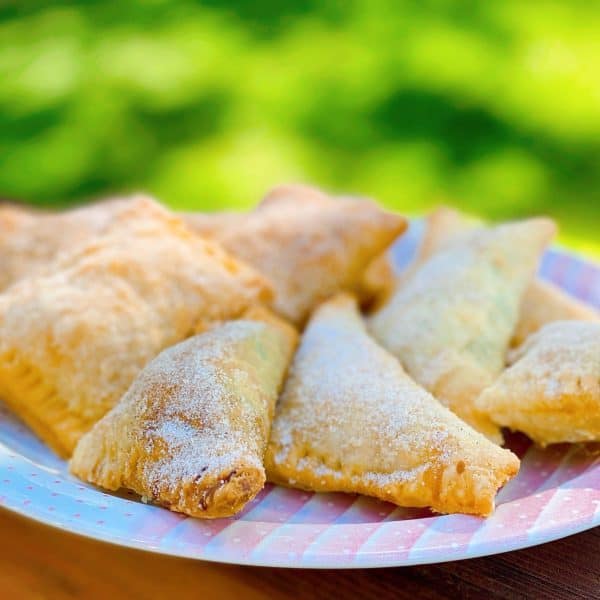
Note: The darker hand pies in the photo below were blueberry. I made two different types of hand pies that day…but today were just talking all things “peach”!
Allow the hand pies to cool slightly before handling. (Trust me you do NOT want to play “hot potato” with a fried hand pie! It doesn’t end well! I may be speaking from experience…)
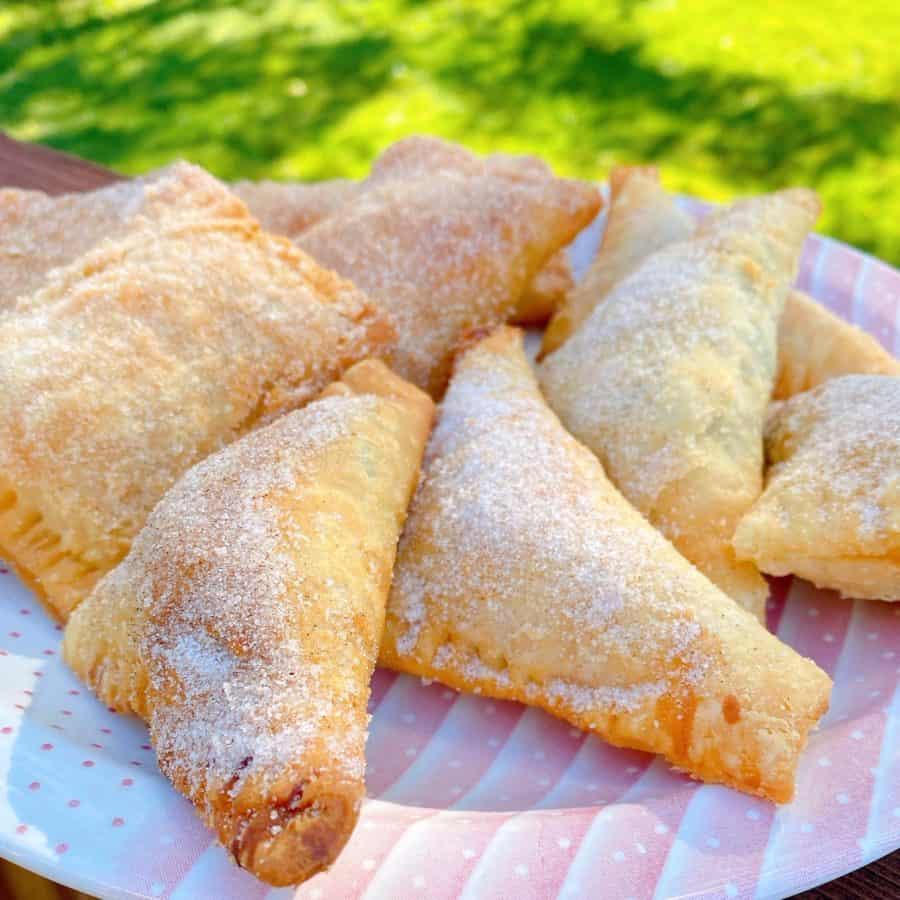
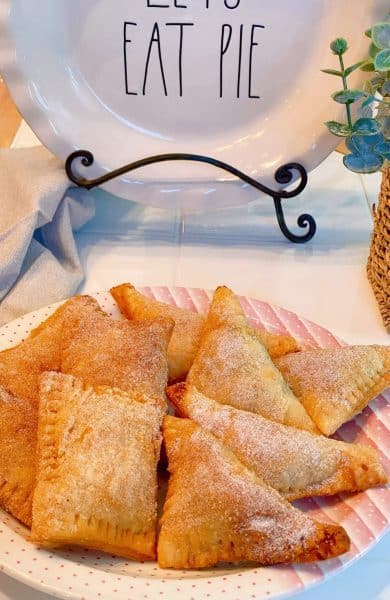
Once the hand pies are cool to the touch, carefully pick each one up and roll them, individually, in the cinnamon sugar. Don’t panic if a few flakes fall of here and there. It’s okay. We wanted ultra flaky pie crust on these delicious hand pies. Those little crumbles mean we have succeeded! As they cool they will become more firm.
TIP: You can lay the hand pie in the cinnamon sugar and use a spoon to sprinkle the cinnamon sugar over the top of the hand pie.
I wish I could even adequately begin to describe the experience you have when eating one of these great Peach Hand Pies! No wonder my Instagram friend Landon bought one every time he went to the Farmer’s Market!
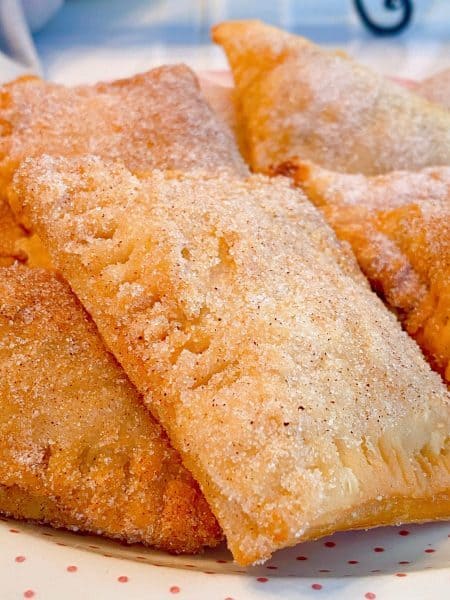
They are light and flaky…so flaky! The crust just melts in your mouth. The filling is pure perfection! The combination of fresh peaches with hints of sweet brown sugar and cinnamon plus that sugary buttery crust… Heaven! Ya drooling yet my friends?
Yes it’s a little extra work to make the crust from scratch…but so worth it!
They’ll hold up to two days in an airtight container…if they last that long at your Nest! They sure didn’t at this one! Not a fan of peaches…substitute apples for the peaches!
This recipe and technique would be wonderful with any of your favorite fruity fillings. Get creative in your kitchen…I’m a firm believer in stepping outside the recipe and doing your thang!
This is the perfect dessert for outdoor picnics or BBQ Pot Lucks! Great for Family Reunions…or hungry husbands who come home from fishing and eat them all! Lol
If you enjoyed this fun fruit filled Hand Pie Recipe you might also enjoy these fruity desserts!
- Fresh Peach Sweet Biscuit Shortcakes
- Double Crust Plum Pie
- Strawberry Rhubarb Pie
- Fresh Classic Blueberry Pie
- Cranberry Apple Pie
- No-Bake Fresh Peach Pie
- Mini Fruit Tartlets with Vanilla Cream
Thanks for taking the time to stop by and visit my Nest today! I hope you’ll give these yummy Fried Hand Pies a try. Invite a little end of summer shine into your kitchen and the tummies of your family!
Have a Great Day and remember…you can find me on Facebook, Instagram, Twitter, and Pinterest every day, where I share my favorite recipes, laughter, and family!
Happy Nesting!


Homemade Fried Peach Hand Pies
Ingredients
Fresh Peach Filling
- 4-5 large fresh peaches peeled, pitted, and cute into bite size chunks
- 1/4 cup butter
- 1/4 cup brown sugar
- 1/2 teaspoon cinnamon
- 3-4 Tablespoon Corn starch
- 1/2 teaspoon lemon juice
Crust Ingredients
- 3 cups all-purpose flour
- 1 1/2 teaspoon salt
- 1 cup plus 3 tablespoons Crisco Shortening
- 10-11 Tablespoons canned evaporated milk
Sugar topping
- 1 cup granulated sugar
- 2 teaspoons cinnamon
- Vegetable Oil for frying
Instructions
- In a large skillet over medium high heat melt butter. Add prepared peaches, brown sugar, cinnamon, and lemon juice. Stir until well combined. Sprinkle corn starch over peaches, continue stirring until mixture thickens. Remove from heat and allow to cool.
- In a large bowl combine flour and salt. Cut in shortening until pea size crumbs form. In the center of flour mixture add evaporated milk. Shake bowl back and forth until mixture begins to form a large ball. Using your hands gather the remaining dough and press into a large ball. Divide the ball in half.
- On a well floured surface place one dough ball. Gently roll it around in the flour. Flour a rolling pin. Roll the dough out into a large rectangle about 9 inches wide and 12 inches long and 1/4 inch thick. Using a sharp knife, trim edges to create a clean rectangle. Cut the dough into 9 smaller rectangles 3 inches wide by 4- 5 inches long. Repeat with remaining dough.
- Place a heaping tablespoon of fresh peach filling in the center of each individual rectangle. Brush the edges with leftover evaporated milk. Fold the short sides of each rectangle together. Press down around the edges with your finger. Finish the edges using a fork to press all the way around the hand pie.
- Place all the prepared hand pies on a baking sheet until ready to fry.
- Line a baking sheet with 3-4 layers of paper towels and place near frying area.
- In a large shallow dish combine sugar and cinnamon until well blended.
- In a heavy medium sauce pan or dutch oven, over medium high heat, add enough vegetable oil till it is two inches deep. Heat oil to 350°. Note: Watch temperature carefully throughout frying with a thermometer.
- Carefully place 1-3 hand pies into the hot oil, making sure they have enough room that they do not overlap each other. Fry 1-2 minutes per side, until lightly golden brown. Using a slotted spatula remove fried hand pies. Place each pie on paper towel lined baking sheet. Allow to cool till slightly warm and easy to handle.
- Place hand pies, one by one, in the shallow dish and carefully coat them in cinnamon sugar. Serve.
Nutrition

Meet the Author
Hi! I’m Norine, the cook, baker, and recipe creator behind Norine’s Nest. I love sharing and creating recipes that invite family, friends, and neighbors to gather around the dinner table. Sharing good food and creating memories with those we love brings me happiness. Thanks for stopping by my Nest!
Can you make these ahead of time and freeze?
Hi Christina!
Yes you can. Be sure to either use canned pie filling, or cook the fresh peaches so they do not have too much fresh juice in them when they thaw.
Enjoy!
Norine
The pastry was a little too greasy however it did have a nice flaky crust. I used 2 cans of freestone peaches instead of fresh peaches. I did chop them up really good. Turned out perfectly except for the pastry.
Hi Mary Jo!
Thanks for you review. I’m sorry the pastry was a little too greasy for your taste. I haven’t had that issue, but we all have different individual taste. I love your changes to the filling. Hope you have a great week. Thanks again for stopping by.
Norine
My daughter loves fried pies but don’t eat any cooked fruit. Could I use chocolate pudding instead of fruit?
Hi Dinah!
I don’t think the pudding would work well with frying! Sadly. I can tell you that the fresh fruit filling is not like regular fruit pie filling and she might enjoy it where she doesn’t generally like cooked fruit. Wish I could be more help.
Norine