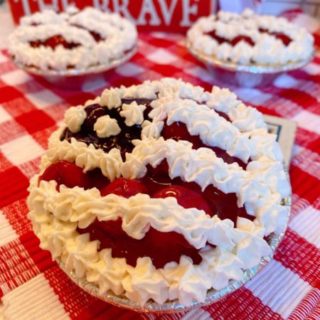
Mini No-Bake Cheesecake Pies
Graham cracker mini pie crusts filled with a rich luscious no-bake cream cheese filling, topped with cherry and blueberry pie filling, and decorated with whipped cream Stars and Stripes, creates the perfect red, white, and blue dessert.
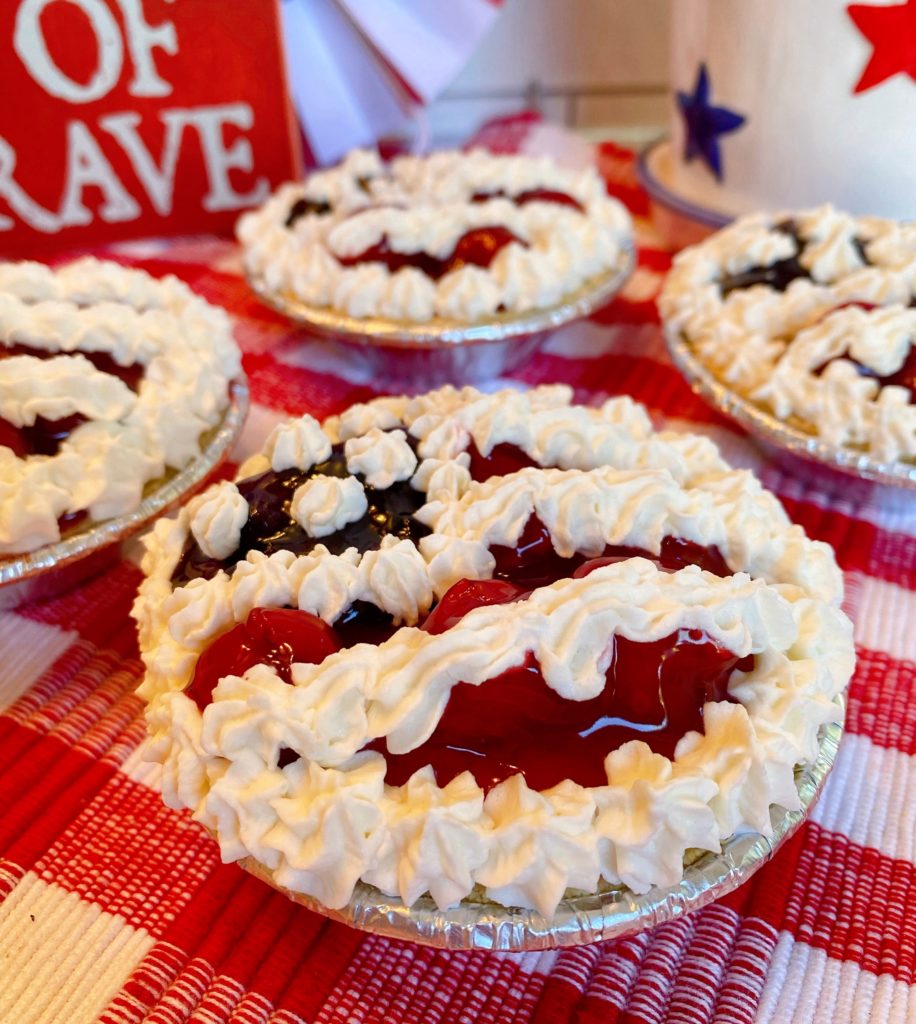
Is there anything better than a delicious cream cheese pie that can be made with 5 ingredients that is also No-bake?!!! Add the delicious cherry pie filling and blueberry pie filling topping, some fun whipped cream decorations, and you have the perfect dessert for the 4th of July!
Creamy, cool, and scrumptious! That is what I had in mind when I came up with this festive dessert.
This is a super easy dessert to make for your guests this Fourth of July!
It’s a retro dessert that’s been around for ages! Our Grandma’s used to make this dessert for church luncheons and bizarres. Church ladies the country wide went gaga for this new dessert. It was quick and easy, made with a few staple ingredients, and tastes as good as it’s distant cousin “Cheesecake”. Without all the hassle of traditional New York Cheesecake.
As is usual, if you’ve followed me for anytime, I tweaked it a tad! I wanted the “cream cheese” layer to really truly have the texture of a baked cheesecake. The original for this recipe creates a very soft cream cheese filling that soft sets. I wanted a firmer set, so I added more cream cheese. (Plus I love the flavor of cream cheese!)
It worked perfectly! I’m so happy with the final results! You will be too. Let’s get busy not baking this No-Bake Easy Cream Cheese Pie!
How to Easily Make Smooth Cream Cheese Filling
Note this recipe can make one 8 inch Pie, if you prefer to make this into one large pie, rather than 12 individual mini dessert pies.
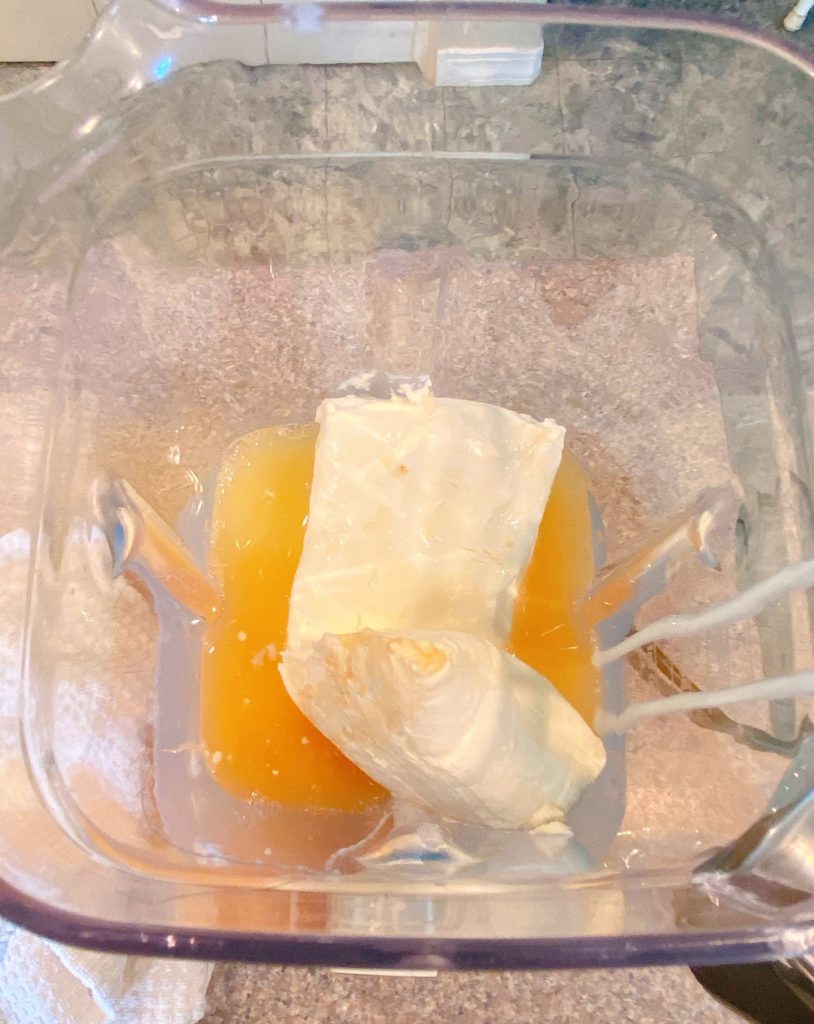
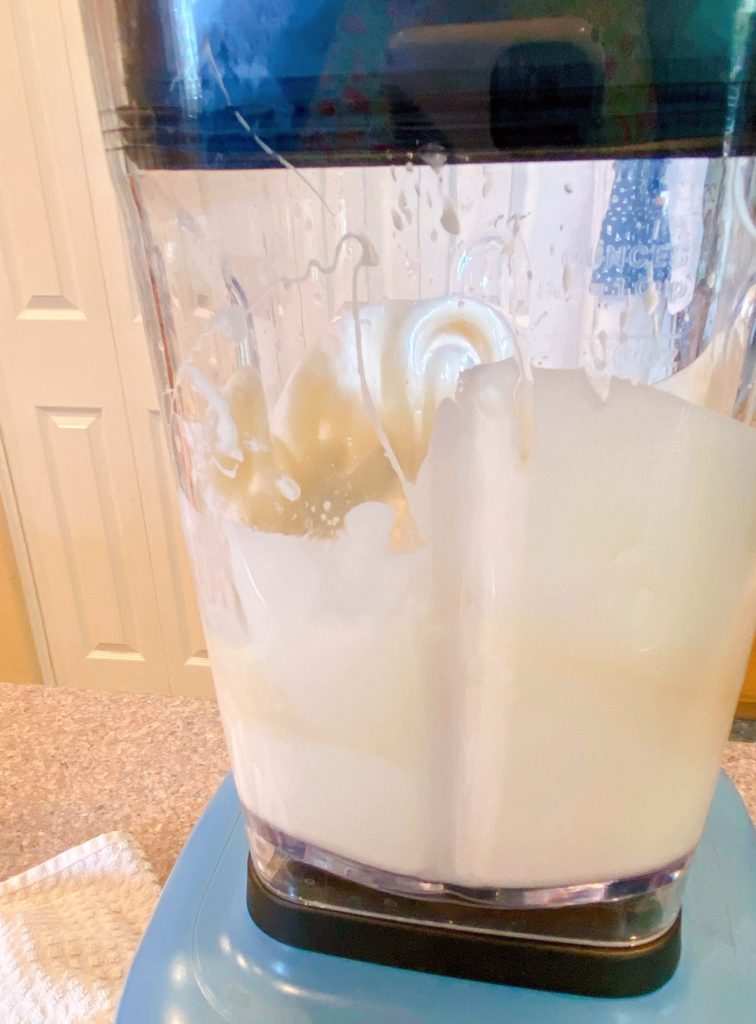
I made this cream cheese filling several times during the “testing” process and made a fantastic life changing cheesecake discovery! You can make the cream cheese filling in your blender with smoother creamier results!
TIP: If you don’t have a blender, that’s okay! You can still use a hand or stand mixer if that is what you have on hand.
In the bottom of your mixing bowl, or blender, add 12 ounces of softened cream cheese, 1 (14 ounce) can of sweetened condensed milk, 1 teaspoon vanilla, and 1/3 cup fresh squeezed lemon juice. Please note that if you want the “softer set” cream cheese filling reduce the cream cheese to 8 ounces, just remember it will be soft set.
TIP: You can use bottled lemon juice…but I highly recommend fresh squeezed. Fresh lemon juice adds a touch of refreshing flavor to this chilled dessert.
On medium speed blend ingredients until smooth, or mix in your mixer, until creamy and smooth. (I’m thinking this blender hack is as close to genius status as I’m going to get… so can we just celebrate this for a minute or two?)
Prepare 12 mini prepared Keebler graham cracker crusts by lining them up on one large baking sheet, two smaller baking sheets, or a deeper cake pan. Fill each pie shell with 1/4 -1/3 cup of the blended cream cheese filling. Smooth the top of each pie with the back of a large spoon or spatula.
Chill the mini cheesecakes up to 4 hours, or overnight! The filling, with the extra cream cheese, will set firm. This is different from the original recipe. The original is wonderful…I just prefer a firmer base to my no-bake desserts, especially cheesecakes.

Finishing off the Mini Patriotic Cheesecake Pies
After the pies have chilled 4 hours, or overnight, it’s time to top these mini beauties off, and decorate them for your party.
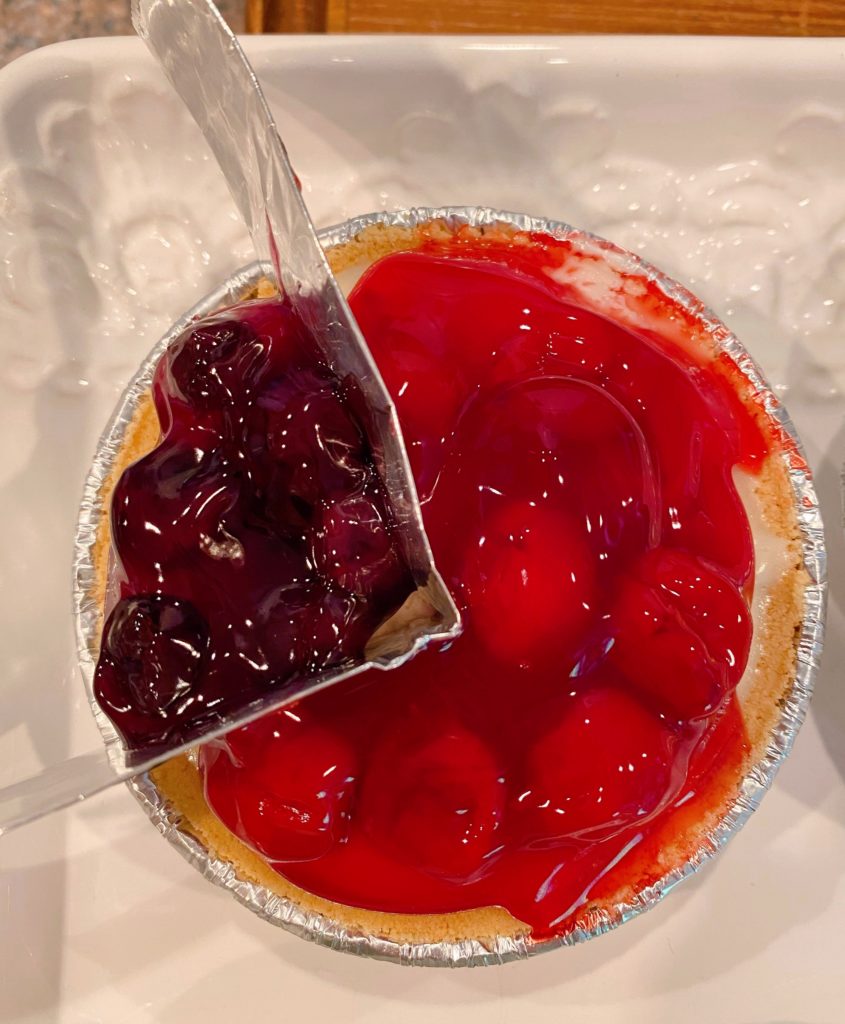
The original recipe calls for one can of your favorite pie filling. Cherry is the favorite of this classic. However, since I was going for a patriotic theme for these individual pies, I used both cherry and blueberry pie filling. You’ll use about 2/3 of the cherry and 1/3 of the blueberry.
Save the remainder of both and swirl them to make my Cherry Crumb Coffee Cake.
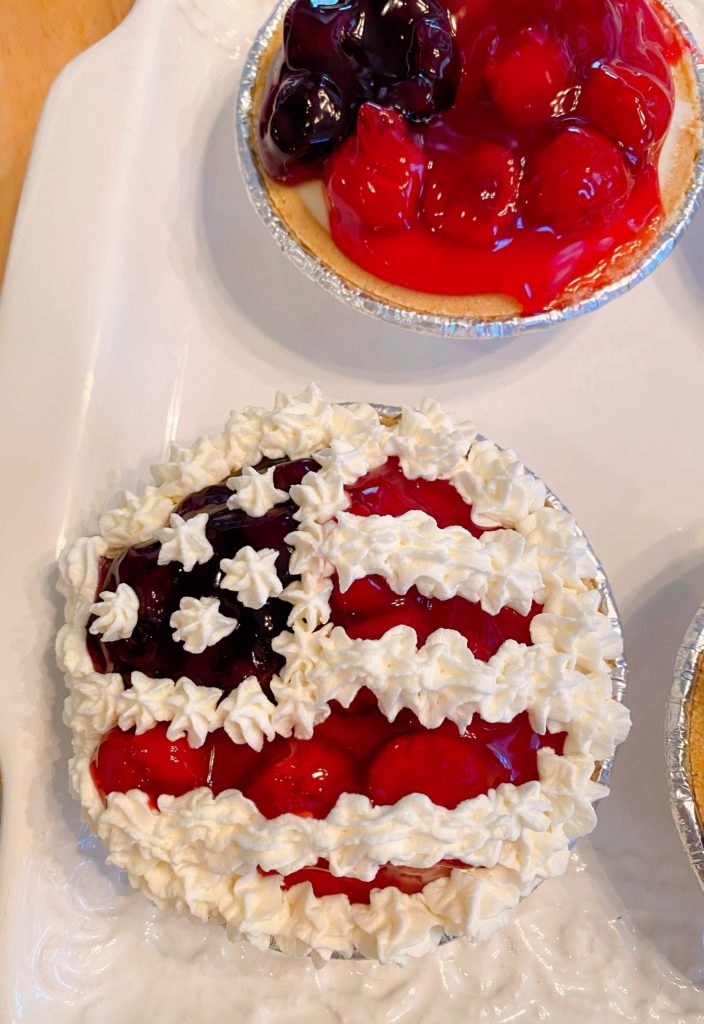
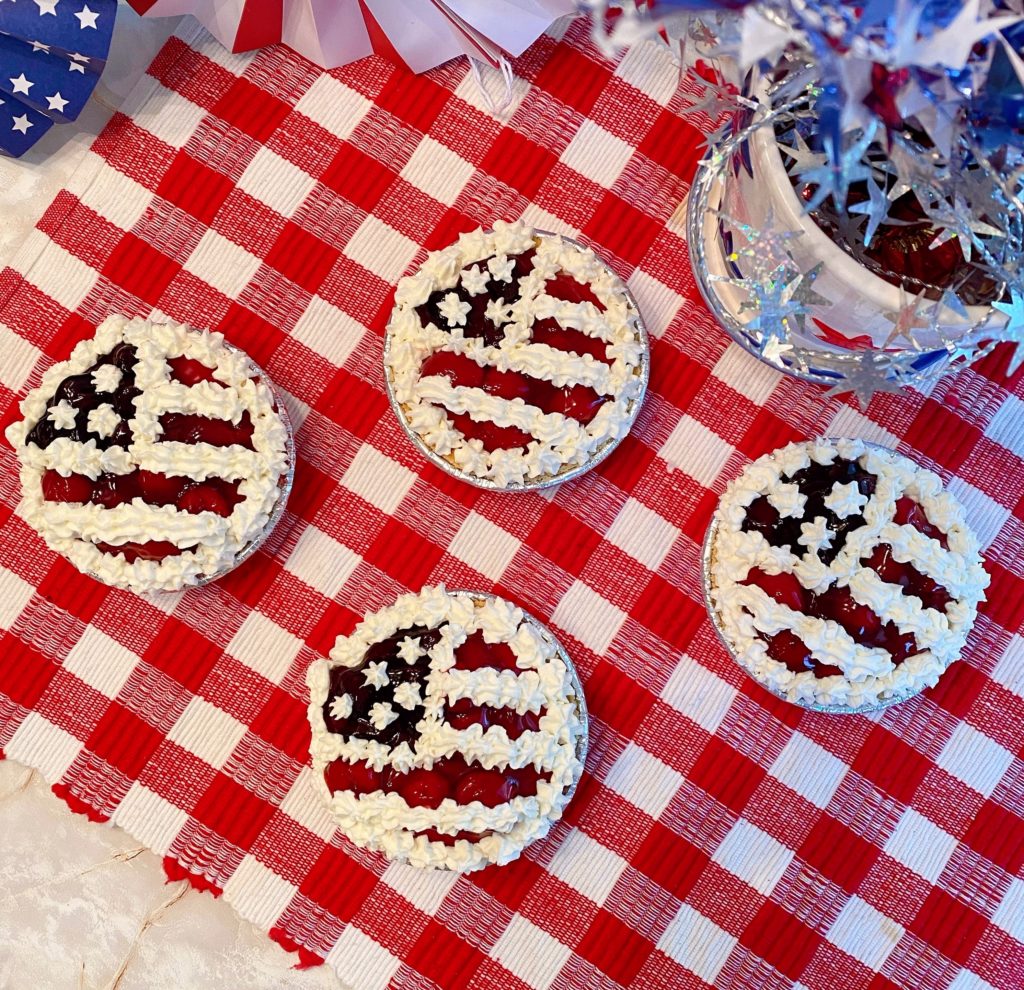
To turn each of these mini pies into a patriotic flag, I folded a 4-inch piece of aluminum foil into 1 inch folds and then bent it in half to create a guide. Open it back up to create and “L” shape. Set the folded aluminum foil guide over 1/4 of the pie. The 1/4 inch slot is for the blueberry pie filling to create the “blue” for the Stars and Stripes.
Drop 1 Tablespoon blueberry pie filling into the 1/4 inch space. Fill the other 3/4ths of the top of the pie with cherry pie filling and carefully pull the aluminum foil guide up and out of the pie filling. Repeat this process on all 12 mini pies.
Adding Whipped Cream Pipping Details
In the bowl of your mixer, with the wire whisk attachment, add 1 cup cold heavy whipping cream. Blend on high until it begins to thicken. Add 1/2 teaspoon vanilla and 6 Tablespoons powder sugar. Continue whipping until whipped cream forms stiff peaks.
In a 16-inch Wilton disposable pipping bag, cut the tip off and place a small open star tip (Wilton #13). Add whipped cream and begin by pipping the stars around the outer edge of the mini pie. This will help hold the pie filling on the top of the pie.
Outline the “blue” section. Add 4 white stripes across the pie to create the “stripes”. Then pipe on 3-4 small stars in the blue section.
Continue pipping whipped cream topping on the remaining mini pies. Place pies on a baking sheet and chill until ready to serve.
TIP: To cover the mini pies, place the mini pies in a 9 x 13 baking dish. The dish is deep enough that you can cover it with plastic wrap without it touching the top of each pie. You will need two baking dishes for all 12 pies, but you can stack them crisscross over each other if you don’t have enough room in your refrigerator.
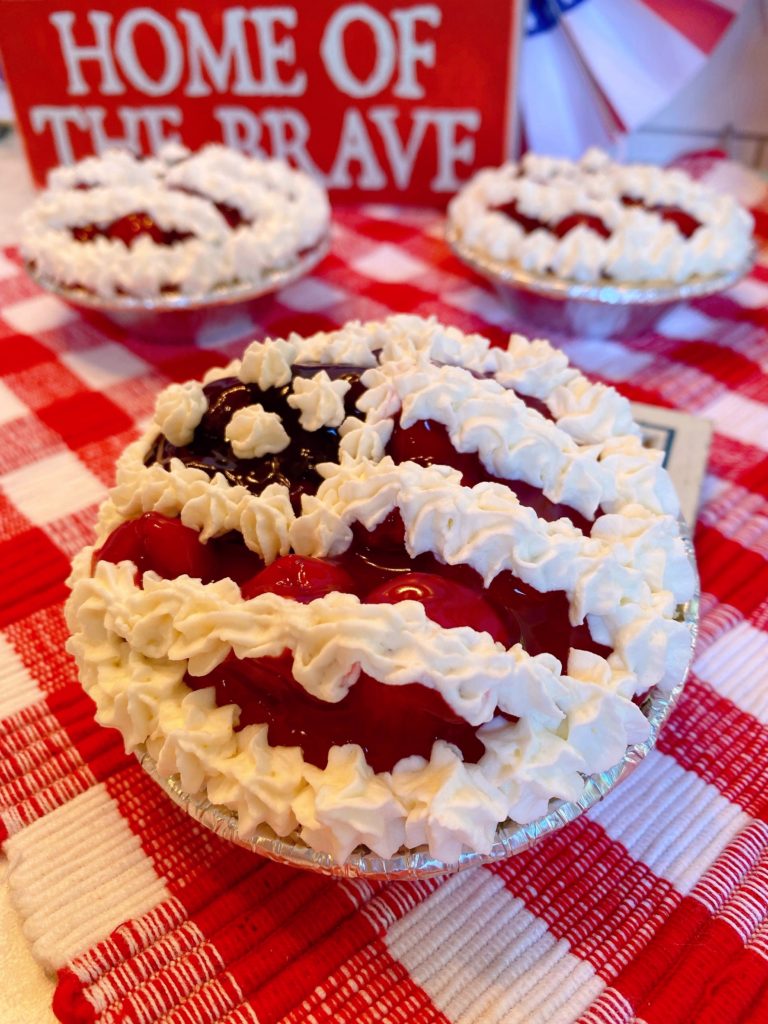
Aren’t these a fun dessert to serve?! I love how they turned out, and they’re just the right size for an individual serving. Your guests will love these little pies.
Plus they’re super tasty! Look at all those layers including that creamy cheesecake layer! (I had to do a little taste testing for this shot! Please appreciate my level of dedication to each and every one of you!)
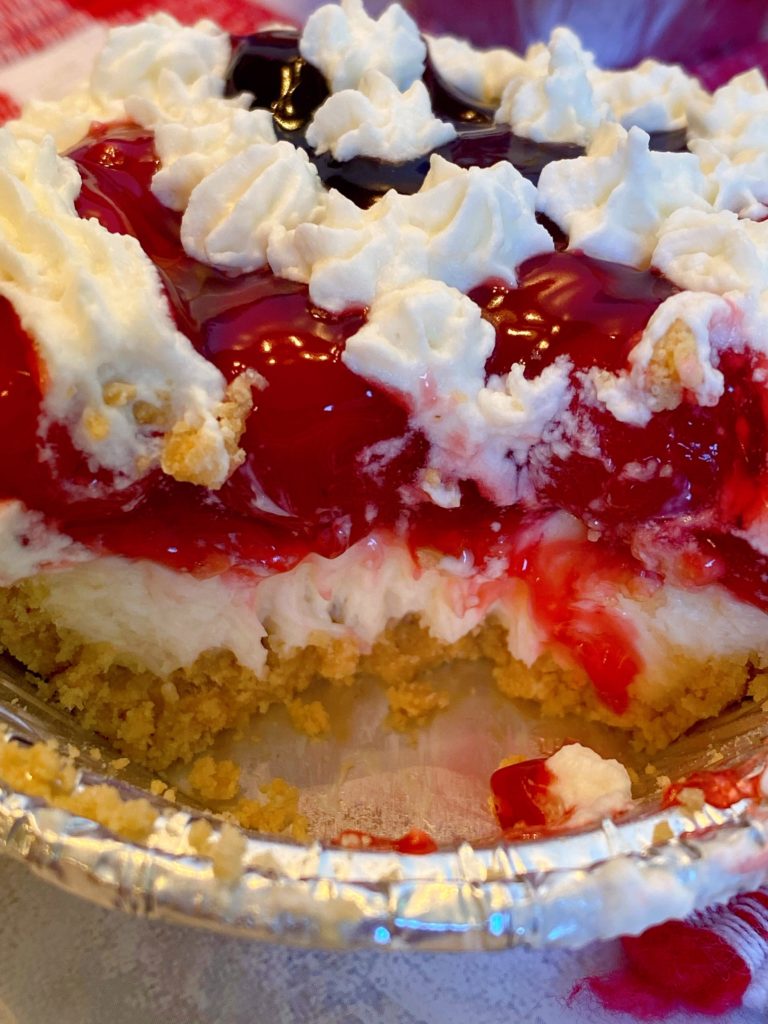
I’m generally a stickler for making your own cheesecake crust…but for these little mini pies, the store bought graham crusts are perfect! The filling sets up beautifully! The creamy lightly flavored lemon layer with the cherry and blueberries is a great combination! So refreshing.
They’re a great summer dessert that is sure to brighten your Holiday table!!!
Alternative Idea for this dessert
Don’t want to mess with the mini pies? Layer this dessert in mason jars! A layer of crumbled graham cracker crust topped with a layer of the cream cheese filling, a layer of cherry, a layer of cream cheese filling, topped off with blueberry topping and a squirt of whipped cream with some star sprinkles on top!
Other 4th of July Dessert Recipe Ideas
- Red, White, and Blue Poke Cake Recipe with Fresh Berries
- Red Velvet Cupcakes with Cream Cheese Frosting
- Sprinkle Sugar Cookies for every Holiday
- Mini Fruit Tartlets with Fresh Berries and Vanilla Cream
- Homemade Fresh Peach Hand Pies
- Chantilly Sheet Cake Recipe from Soulfully Made
Happy Nesting Friends!
Mini No-Bake Cheesecake Pies
Ingredients
- 12 mini graham cracker pie crusts
- 12 ounces cream cheese softened
- 1 14 ounce can Sweetened condensed milk
- 1 teaspoon vanilla extract
- 1/3 cup lemon juice fresh squeezed if possible
- 1 can cherry pie filling
- 1 can blueberry pie filling
- 1 cup heavy whipping cream chilled
- 1/2 teaspoon vanilla
- 6 Tablespoons powder sugar
Instructions
- Place mini pie shells on large baking sheet, or two smaller baking sheets.
- In the bottom of your blender, or in the bowl of your mixer, add softened cream cheese, sweetened condensed milk, vanilla, and lemon juice. Blend, or mix, until smooth and creamy.
- Spoon 1/4 – 1/3 cup of cream cheese filling into each mini pie shell. Smooth top of each pie evenly. Chill 4 hours or overnight.
- Create a guide out of aluminum foil by tearing off a 4 inch piece of foil. Fold in one inch increments then fold in half. Open foil up to create an "L" shape. Place on 1/4 of the top of each mini pie as a guide.
- Fill the 1/4 inch opening with 1 Tablespoon of blueberry pie filling. Fill the remaining 3/4 of the top of each pie with cherry pie filling. Approx. 2 Tablespoons of pie filling.
- In the bowl of your mixer add heavy whipping cream. With the wire whisk attachment, on high speed, mix whipping cream until it begins to thicken. Add vanilla and powder sugar. Continue whipping until stiff peaks form.
- Place whipping cream in a pipping bag with a #13 open star tip. Pipe stars around the edge of each mini pie. Pipe around the blueberry pie filling to create the section for the stars. Pipe 3-4 stars on the blue section, and then pipe lines for the stripes on the cherries.
- Chill until ready to serve.
Nutrition

Meet the Author
Hi! I’m Norine, the cook, baker, and recipe creator behind Norine’s Nest. I love sharing and creating recipes that invite family, friends, and neighbors to gather around the dinner table. Sharing good food and creating memories with those we love brings me happiness. Thanks for stopping by my Nest!

1