Best Roasted Thanksgiving Turkey
Brined in an apple citrus herbed brine for 24 hours, then basted in a rich wine butter drenched cheesecloth and baked to perfection! This Roasted Thanksgiving Turkey Recipe is truly the BEST! Tender, Moist, and Full of Flavor! It will be the star of your Thanksgiving Feast!
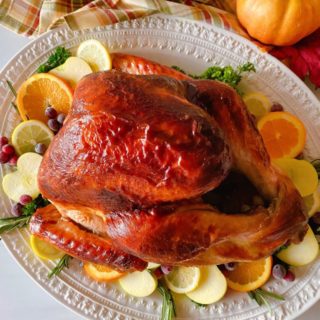
Isn’t she a beauty! It’s taken me years, and a lot of dry turkey, to finally create the World’s BEST THANKSGIVING TURKEY recipe!
I did a lot of research over the years from various sources. After a lot of trial and error, trying various techniques, I believe I have created the BEST recipe for the world’s favorite November roasted bird!
What Makes This The BEST Thanksgiving Turkey?
It’s a combination of things. A beautiful golden crispy skin. Plump Juicy Meat…so juicy and tender that the breast cuts with a fork! (That’s right…a FORK! Save that knife for stabbing that last dinner roll or annoying relative! Lol) Infused flavors from a delicious brine, and a lot of buttery wine basting!
What makes it even better is a recipe that is easy to follow! This recipe breaks down into three segments. Brining, Roasting, and Basting!
The flavor in this turkey comes from two different sources…the amazing apple citrus spiced brine and the incredible wine butter it’s basted in for over 3 hours.
How To Make The Perfect Thanksgiving Turkey
There are several important elements that go into making this bird brilliant!
I remember the first time I made a Turkey for Thanksgiving dinner. It was terrifying! The last thing I’d want was for any cook, experienced or new, to go through the same thing I did.
I’ll walk you through my recipe for the Best Thanksgiving Turkey, step-by-step! If you follow my instructions, you’ll be Queen, or King, of the Roasted Fowl!
A few TIPS to take note of before beginning…
- Chose a Turkey that will feed ALL your guests! A 16 lb Turkey will serve 8 adults. I generally make a 20–22 lb turkey. This will serve between 12–14. Leftovers for turkey sandwiches are a must!
- Thaw the Turkey completely before Thanksgiving Day! Follow the Turkey Etiquette rules and thaw that bird for a week in the fridge.
- This recipe has you brine the turkey the day before you cook it. DO NOT let that keep you from making this Turkey. Many of us don’t have a refrigerator room for brining. That’s okay. I’m going to share a fantastic tip for Turkey brine. For years, I didn’t brine because I didn’t have space to do that, or so I thought.
- This Turkey is stuffed, but doesn’t have to be. It will add extra flavor to both the turkey and your stuffing. Please note that all the cooking times. I will share with you a turkey that is stuffed! Adjust the cook times if you are not stuffing your Turkey.
- This Turkey is basted in Wine and Butter! I can’t emphasize this enough…do NOT skip this step! The flavors the wine adds, and the reaction wine has with the enzymes in the muscles of the meat are truly amazing! Plus, it will make mind-blowing gravy!
How To Make Citrus Spiced Brine
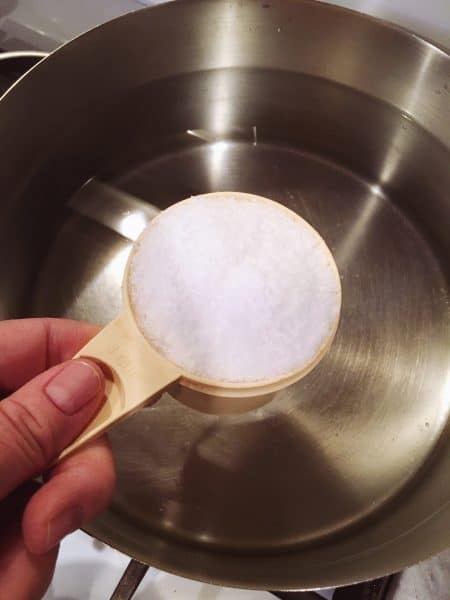
In a large stock pot add 6 quarts, or 1½ gallons, of water. Add 1½ cups of coarse kosher salt. Place over high heat. Bring to a boil, and boil for 15–20 minutes until salt is dissolved.
Add 2 cups of apple cider and 1½ cups of orange juice, with or without pulp. Either is fine for this recipe.
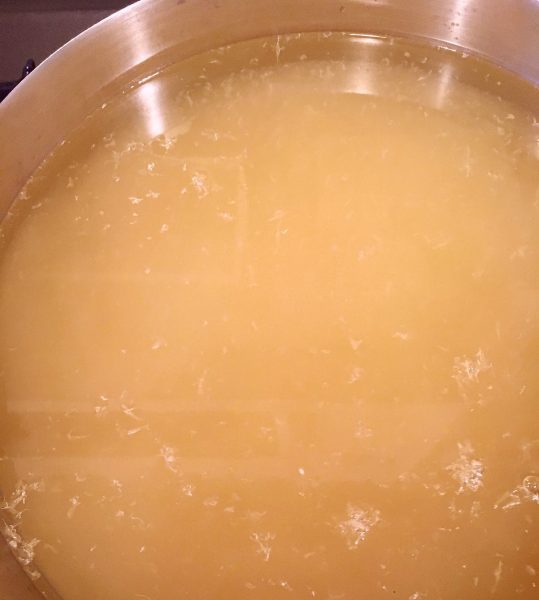
Add 2 teaspoons dried thyme, and 2 teaspoons of crushed rosemary. Stir well. (That’s the shortest direction you’ll get in this post! Lol)
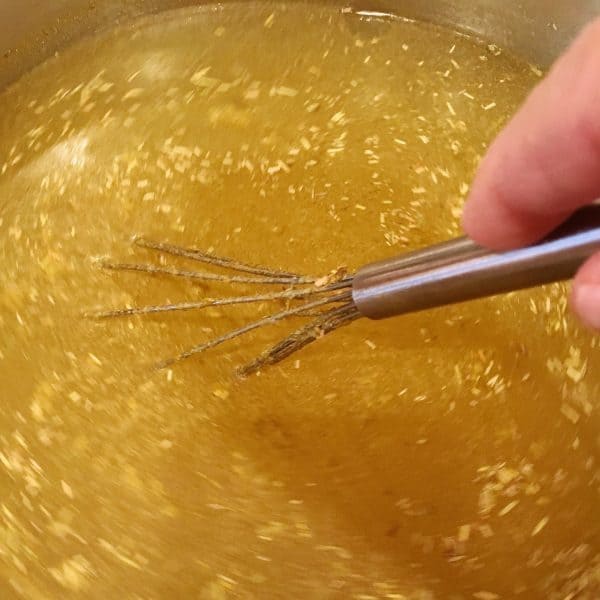
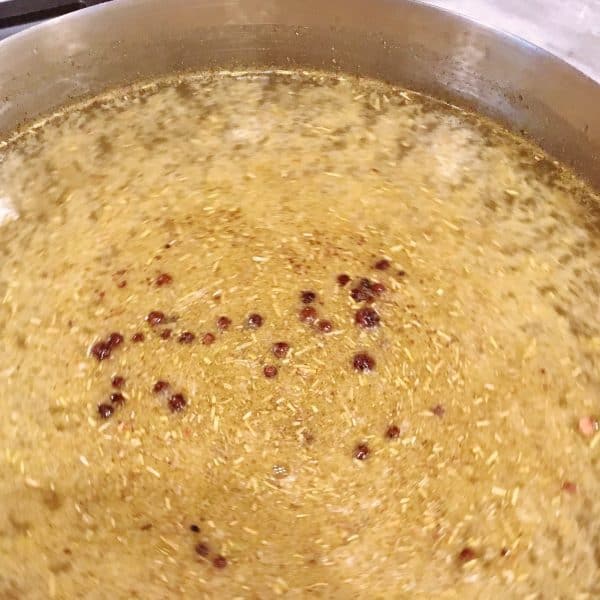
Add 1½ Tablespoons of whole allspice. Stir. (I lied…that’s the shortest direction you’ll get in this post!) Allow brine to cool to room temperature. This is a must! We do not want to cook the turkey!
TIP: I make my brine the night ahead of when I actually want to start the brining process. This gives it plenty of time to cool. Just cover the pot and in the morning it will be cool.
Preparing Turkey for Brining
While the brine is cooling, it’s the perfect time to start what I like to call, so I do… “W.W.E. Thanksgiving WrestleMania”! (Honestly, I don’t think there is anything harder than to wrestle a 22-23 pound slick Turkey! It’s like they’re still fighting for one last chance at life! )
Place the turkey in a VERY large bowl.
I’m going to state the obvious…remove the plastic wrap! (It’s not Turkey Spandex…it needs to come off, and you’re going to have to touch that bird’s bare naked skin!)
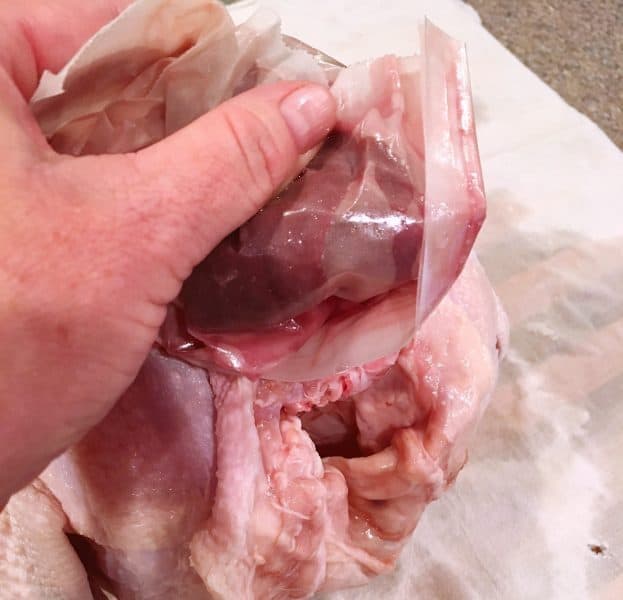
Now for the fun!!! See the Turkey’s “Buttock hole”… Yep…you’re going in there! (Deep breath!)
Reach in and pull the neck out of there. (See…some turkeys do have their heads up their butt! Lol!!! Hope you weren’t drinking when you read that line!)
Next…find where the neck used to be before that Turkey got too big for his britches! See the paper sticking out…he didn’t swallow that! Yep…you’re going in again!
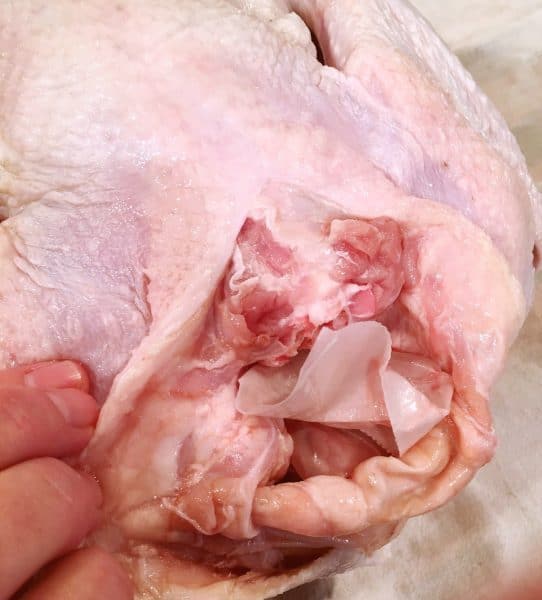
Grab a hold of that paper and give it a good “yank”… that fun little package holds all the vital organs.
Some folks like to use those in their stuffing. I’m not one of those people! Bye-bye little package of organs.
Now that all the inside parts have been removed, rinse the Turkey well inside and out. Place turkey on a large clean dishtowel and pat dry.
I’m not going to join the debate on rinsing poultry in the sink and cross contamination! Any time you’re working with fowl, you need to be cautious of contamination and clean up after handling it. Be sure you clean and sanitize your work areas.
How To Brine A Turkey
TIP: Time for the BIG tip on brining! Every time I watched a video on brining a turkey they would place the turkey in this HUGE bucket and then place it in the refrigerator. I don’t know about your nest…but mine didn’t come with a walk-in cooler!
So I came up with this brilliant…if I do say so myself…alternative. It’s called an Ice Chest!
Using a large marinating bag that you can purchase on Amazon, or other specialty cooking shops.
DO NOT USE A TRASH BAG! Trash bags today are coated with chemicals!
Place the turkey in the bag and add a sprig or two of fresh sage.
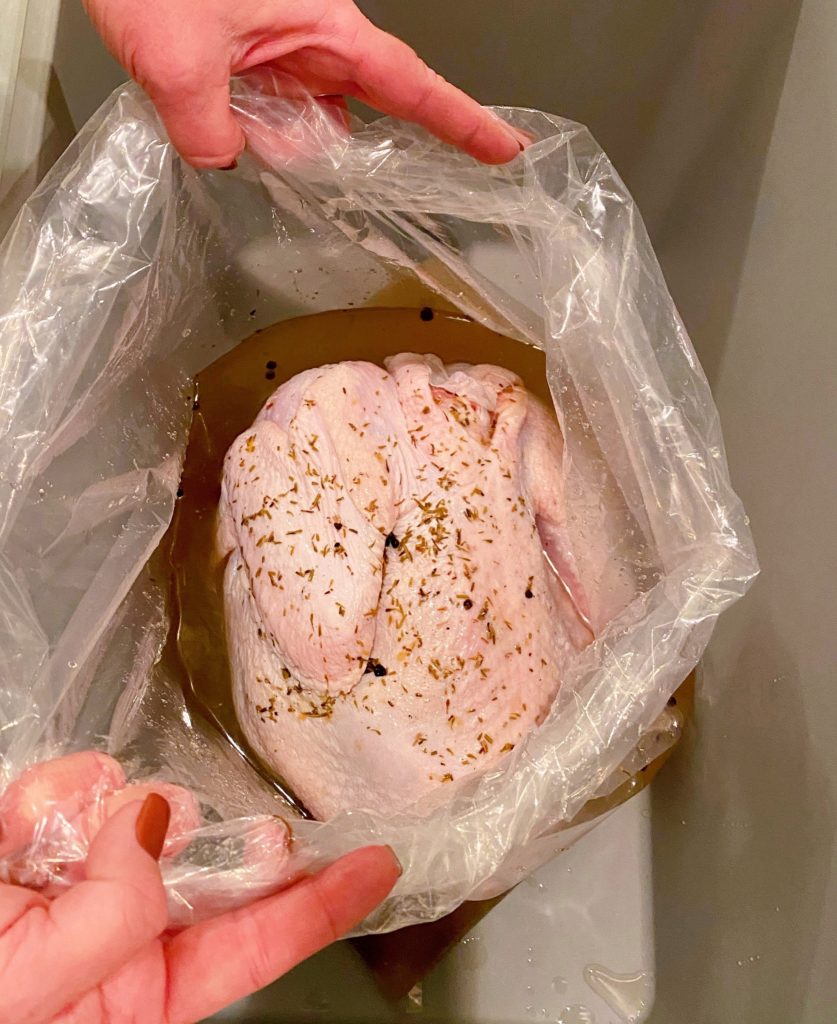
Place the Turkey inside the bag into a large Ice Chest.
Adding Brine To Turkey
You’ll need a helper for this next step. Someone will need to hold the bag open, while the other pours the cooled brine over the Turkey.
TIP: DO NOT MAKE THE MISTAKE OF THINKING YOU CAN DO THIS ALONE! It’s been tried…and it isn’t pretty, my friends! (If you enjoy a self-brine session and mopping…you can do this alone…otherwise…ask for help!)
Pull the bag up to see how far the brine comes up and over the Turkey. If the brine doesn’t completely cover the turkey, add more water.
TIP: Place the Turkey Breast side down. In fact, I recommend it. It helps the brine to soak into the breast meat.
Tie brine bag in a tight knot. Notice as the bag pulls tight, the liquids come up and surround the bird better than when the bag is open.
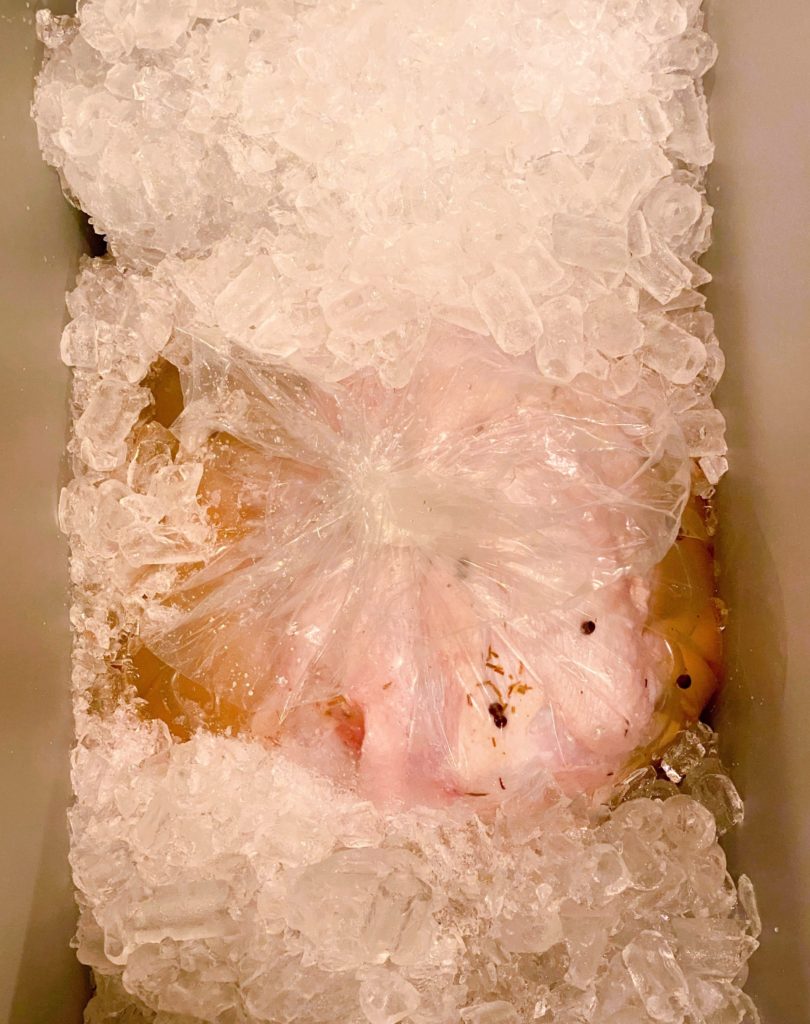
Cover with ice! Lots of Ice. You’ve just created your own little brining cooler! Leave to soak for 18–20 hours. Magical things are happening inside the brine bag!
Preparing the Turkey for Roasting
Do a few push-ups…lift a few weights…that Turkey has just put on an extra 5 pounds! If you have never brined a turkey, you will be shocked at how much brine can be absorbed into the meat of the turkey.
Lift the bag out of the ice chest and take it over to the sink. (Yes, we’re about to rinse the turkey in the sink so be sure to sanitize the sink after! This is still raw poultry.)
TIP: Place a drain catcher in the drain to catch the whole allspice seeds. You don’t want them down your garbage disposal.
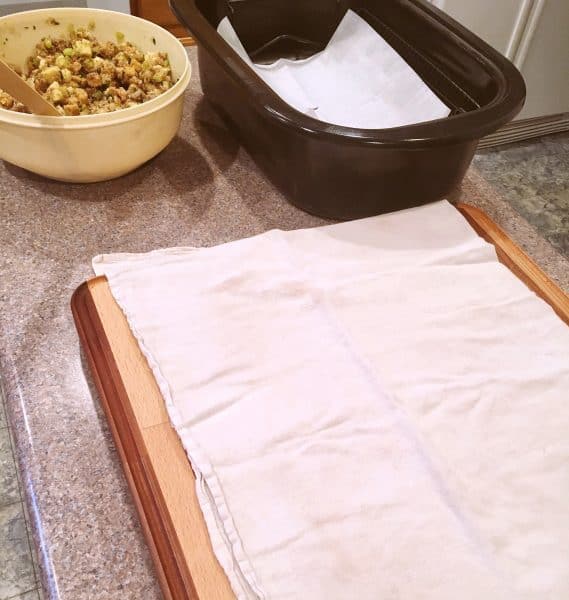
Creating a Prep Station for your Turkey
Before you remove the turkey from the brine, be sure to have your “prep” area ready to go!
If you’re stuffing your turkey, prepare the stuffing and have it ready to go. Have string or Poultry lace pins ready to go to close openings. A heavy metal roasting pan with rack. Be sure to have at least one yard of cheesecloth on stand-by as well.
TIP: I lined my rack with parchment paper with slits so cleaning my rack would be easier. However, this is totally optional!
Have a large towel in your work area to catch any remaining liquid from the turkey.
TIP: I use the pan out of my electric portable Roasting Oven. It’s the perfect size for just about any Turkey. The enamel coating makes clean-up a breeze too. I’m a believer that everyone should own an electric roasting oven.
How To Dispose of Turkey Brine
Use kitchen scissors to cut the top off the brine bag.
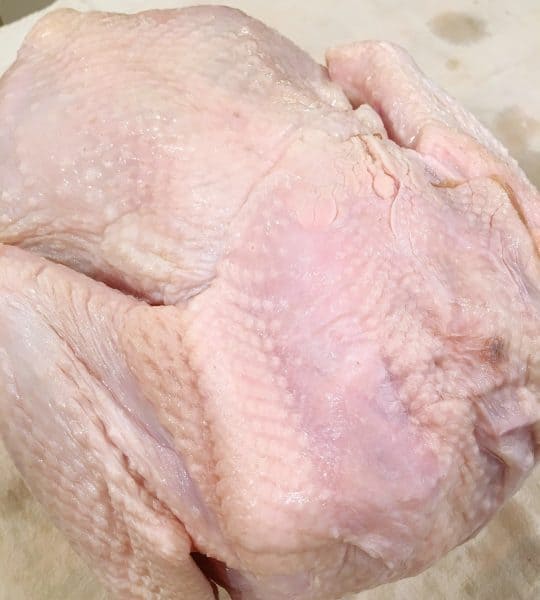
Remove the turkey from the brine sack. Rinse turkey. Some of the herbs will stick to the turkey. That’s perfect! You just want to rinse the allspice seeds off the turkey and out of the crevasses. No one needs a cracked tooth for Thanksgiving!

Place rinsed turkey on a large kitchen towel in your work area. Pat dry. Flip the turkey over and dry the back.
Should I Stuff My Turkey?
There’s a lot of controversy over “to stuff” or “not stuff” your Turkey. I’m a stuffer! Most agree it’s best not to stuff your turkey. That’s fine.
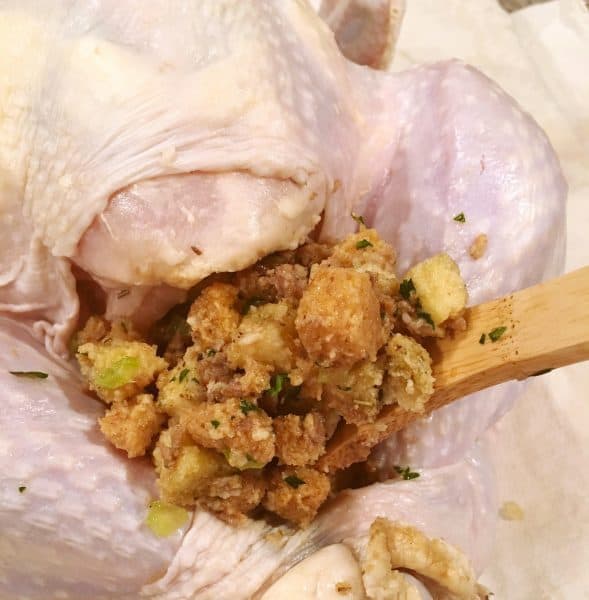
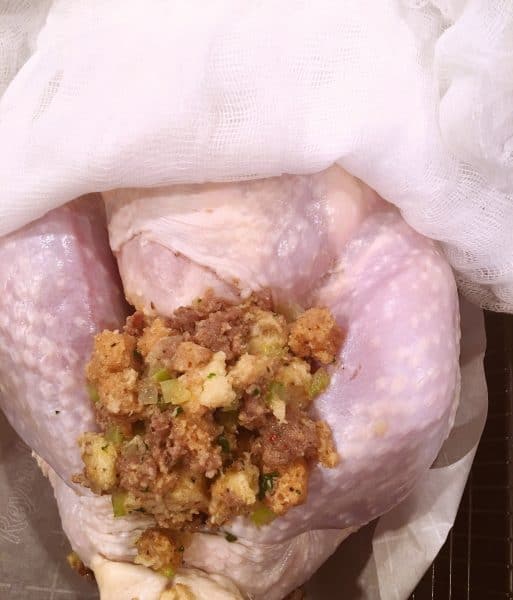
I actually do both because of the amount of stuffing I make. Everyone loves the flavor and moisture my Sausage and Herb Stuffing gets from being cooked inside the Turkey!
TIP: The important thing to remember is the stuffing needs to be freshly made and warm when stuffed inside the bird. Fill cavities loosely with as much stuffing as they hold comfortably; do NOT pack too tightly.
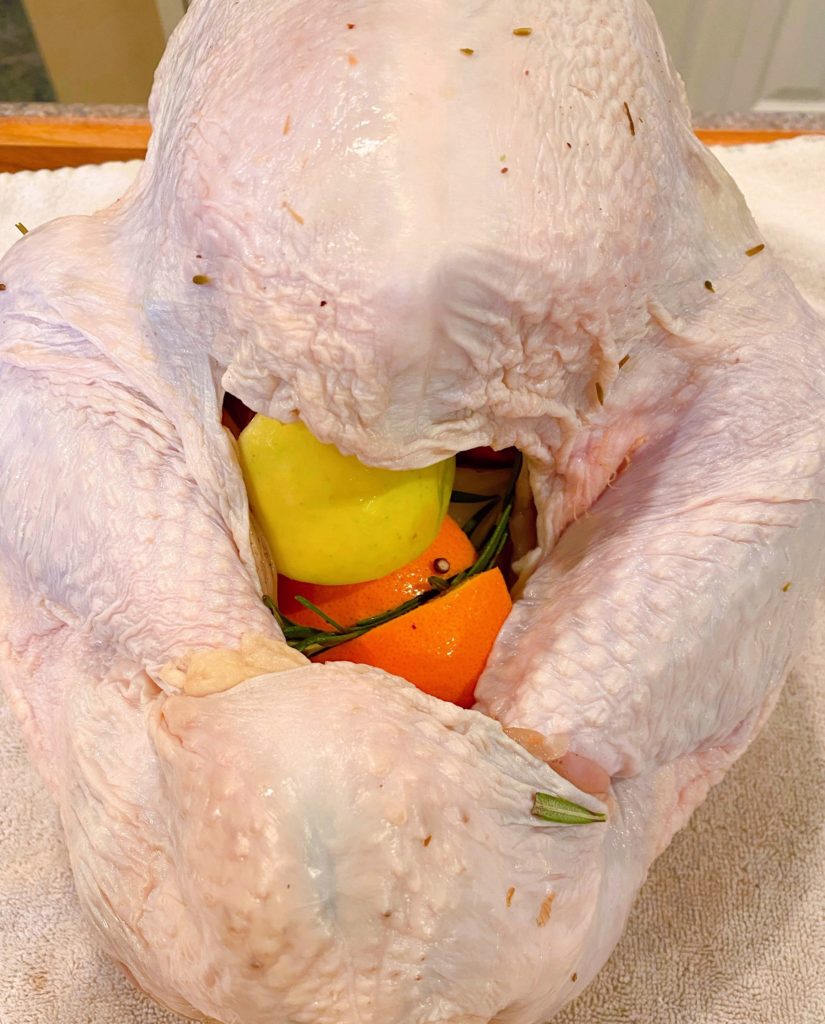
What to do if you’re not stuffing the Turkey with Stuffing?
If you are NOT stuffing the bird with stuffing, you will want to stuff the cavity of the turkey with large chunks of onions, orange and apple wedges, a little rosemary and sage, to add extra flavor and to help hold the shape of the turkey breast while roasting.
Stuffing the Neck of A Brined Turkey before Roasting
With the turkey on its back, you can stuff the neck opening by peeling the extra flap of skin back. Stuff the hole, but remember not too tightly. It’s key that there is room for air flow during roasting.
Pull skin back over stuffing towards the backbone of the turkey.

Using a Poultry Lace Pin, pin the skin down to the back, or you can tie bakers twine around the skin flap and around the front.
I love Poultry Lace Pins. They’re strong & sturdy and last for years.
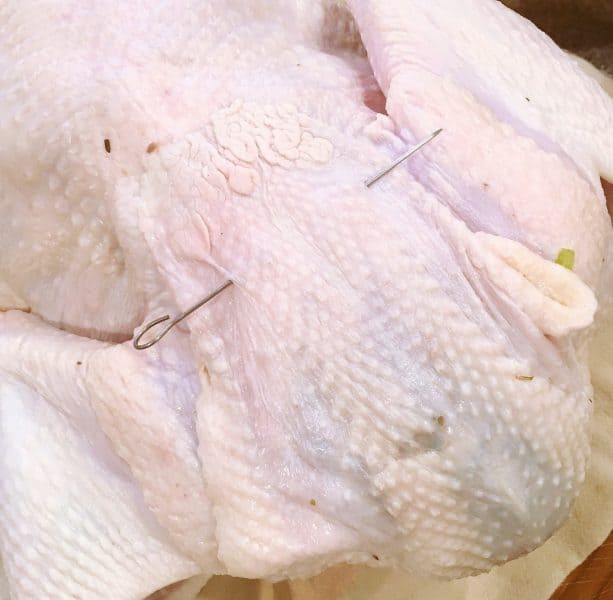
Carefully flip the turkey back over breast side up.
Preparing A Turkey for Roasting
Slide your hand under the skin of one side of the breast and loosen it from the meat. Repeat on the opposite side. (We’re getting very intimate with this Turkey! It can be a little disgusting…just don’t think about it!)
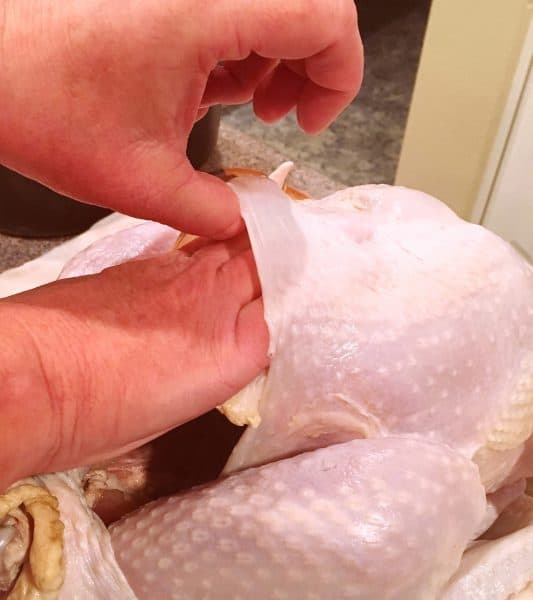
Once the skin is loosened on both sides, place 4–6 Tablespoons of softened butter under the skin on both sides! You can use a herbed butter for extra flavor. I just use regular softened butter. Be careful not to tear the skin.
Slide the pats of butter right under the skin. Holding the skin down, run the back of your hand down over the skin and butter to spread it out under the skin.
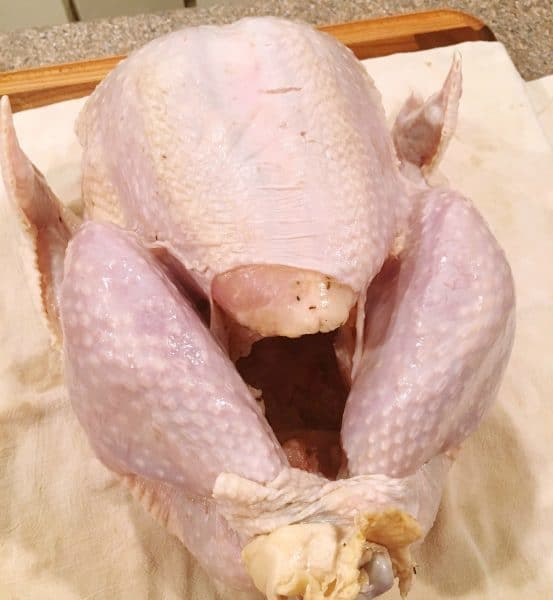
If the legs of your turkey are not held together with extra skin, tie them together before stuffing the stomach cavity. This is a good time to fold the wing tips back and under the Turkey.
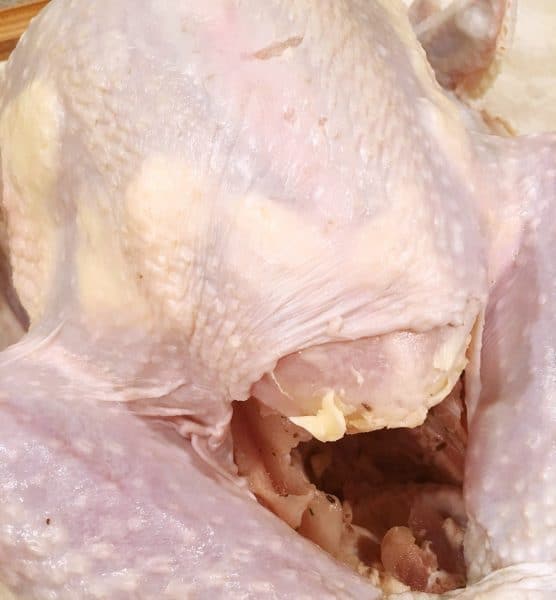
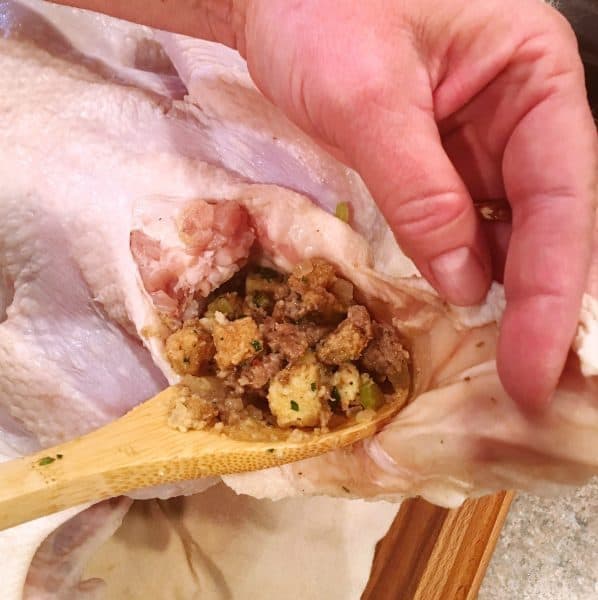
Stuffing the Cavity of the Turkey
Use a large spoon, or your hands (I mean they’ve been everywhere at this point), if you’re going to stuff the bird, loosely stuff the cavity of the turkey.
Place turkey breast side up, directly on the parchment paper (optional), on a roasting rack in a heavy metal roasting pan.
Basting With Wine Butter
Before covering the turkey with cheesecloth, be sure to tuck the turkey’s wing tips under the bird. Hold a wing in your hand, lift that side of the turkey a couple of inches, tuck the wing underneath the turkey’s back. Repeat on the other side. This will allow for even roasting and prevent the tips from burning.
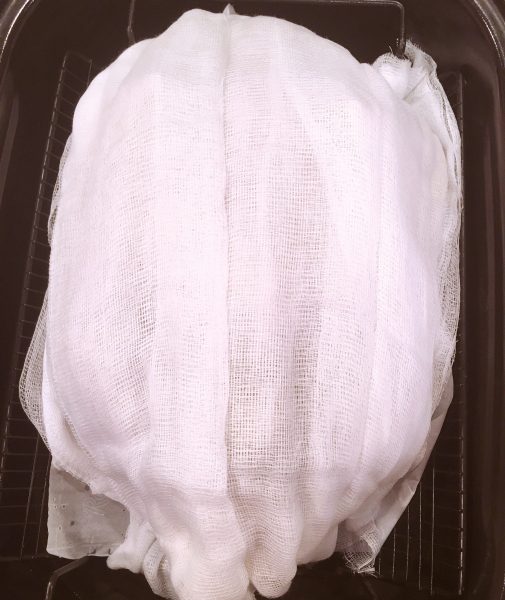
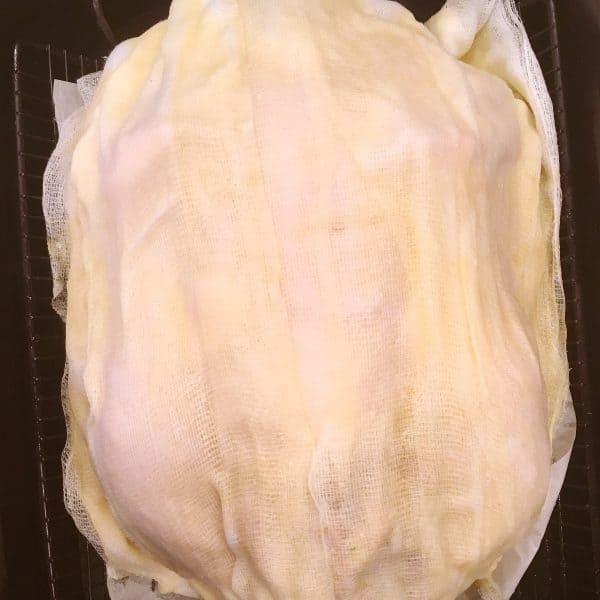
Take the yard of cheesecloth and cut it the length of the Turkey. Repeat 4 times. You’ll need 4 strips of cheesecloth long enough to cover the entire length of the turkey. It doesn’t have to completely cover the legs of the turkey, but should go at least halfway down the sides of the bird.
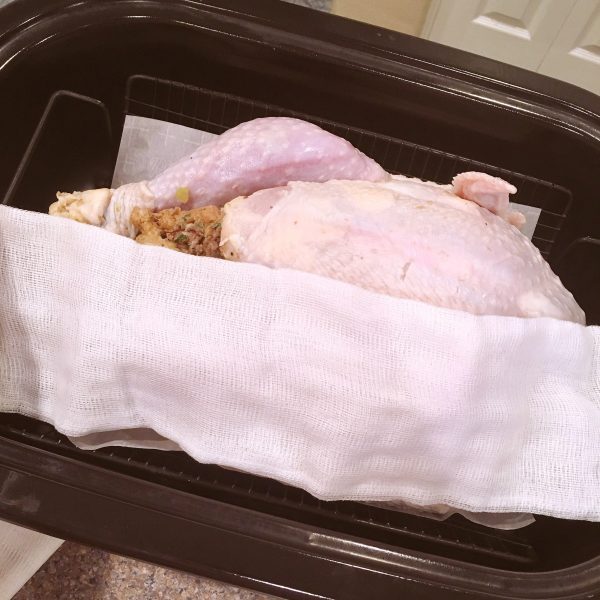
Open up each strip of cheesecloth and lay one strip on top of the other. Lay the stacked cheesecloth on top of the turkey and cover the entire turkey with the cheesecloth. (I like to think of it as his little blanket to keep him toasty while roasting!)
Make sure it covers the entire top half of the turkey!
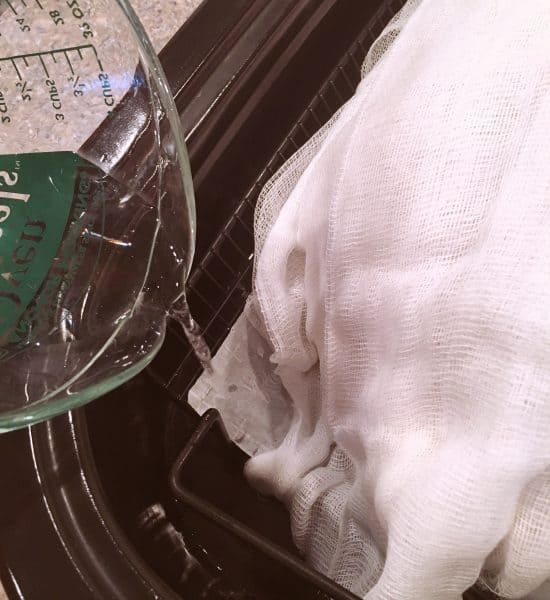
Add 4 cups of water to the bottom of the pan!
Why are we adding water? For the first 3 hours of baking time, we are going to be basting with wine and a pound of butter under high heat.
It will burn in the bottom of the pan, like butter tends to do, without some sort of liquid in the bottom of the pan.
NOTE: You will be adding water throughout the cooking of this turkey so that you’ll have enough drippings to create an amazing gravy that should not need to have the “fat” drained off. ALWAYS MAKE SURE THERE IS LIQUID IN THE BOTTOM OF THE PAN.
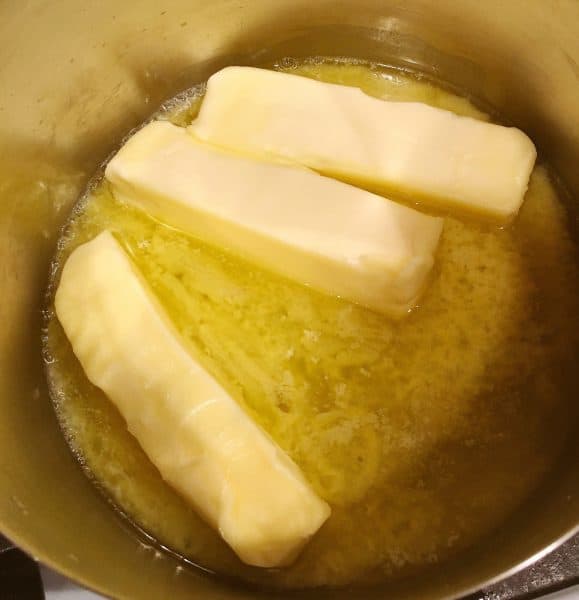
Creating Butter Wine for Basting
This is my favorite part of this recipe! The single most important element for the magnificent gravy that is to follow. Plus…you will get a perfectly golden turkey every time!
In a large sauce pan over medium heat, melt 1 pound of salted butter. I know! That’s a LOT of butter. Seriously? Are we counting calories at Thanksgiving dinner? NO we are NOT! Tom gave his life for us…the least we can do is pay him the respect he deserves by slathering him in wine and butter!
Speaking of wine…most of you know we are a “dry” nest and don’t drink alcohol.
However, I love the benefits of cooking with wine or other spirits. It took a lot of trial and error for me to find the perfect wine for this basting wine butter. (Difficult when you can’t taste test!)
I finally hit on it last year when I stumbled on this beautiful bottle of Vendange Chardonnay with its fruity hints of pear and apple with toasted oak!
We hit it out of the ballpark with this one, my friends! Purchased this bottle because of the flavors it boasted. Nope, I didn’t have one taste while cooking. I just reveled in the benefits of its beautiful blend after the fact.

You are going to add 6 cups, or 1 750-ml bottle, of dry white wine into your butter as it is melting! (See why my Turkeys like me! I stuff ’em, give them a blanket, and a lot to drink!)
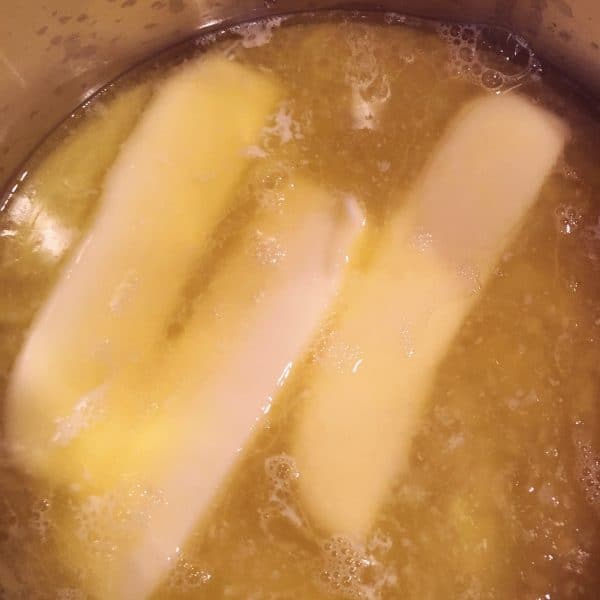
Using a ladle, carefully spoon the butter and wine mixture over the cheesecloth.
Do NOT use all the butter and wine mixture. You should have enough leftover for 3–4 bastings.

Make sure the entire cheesecloth is covered in butter and wine mixture.
How to Properly Roast A Turkey
Place a rack in the oven on the lowest level. Preheat oven to 400°. Cook for 30 minutes.
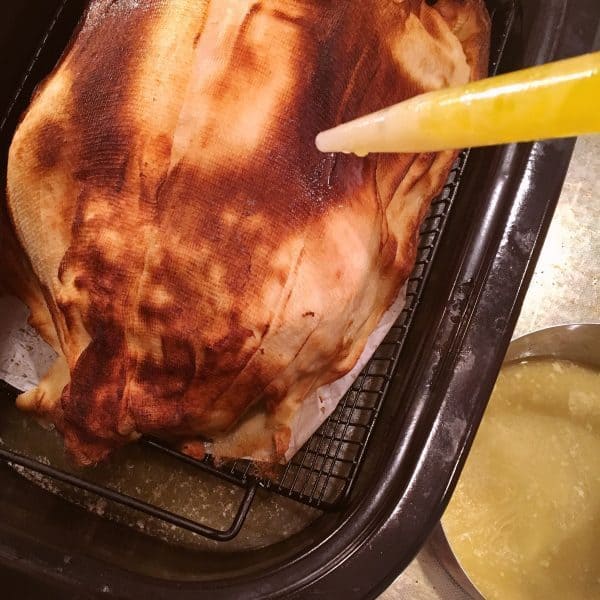
Using a pastry brush or baster, baste cheesecloth and any exposed parts of the turkey with the butter and wine mixture.
Reduce the oven temperature to 350°, continue to cook for 2 more hours, basting every 30 minutes and watching pan juices.
You may need to add water to the pan at each basting depending on how much of your liquid has evaporated during cooking.
TIP: If you run out of butter and wine mixture, continue to baste with pan drippings over cheesecloth.
After the third hour mark, baste again. This will help loosen the cheesecloth, then gently remove the cheesecloth using tongs to pull it back. Be careful! It will be very HOT!
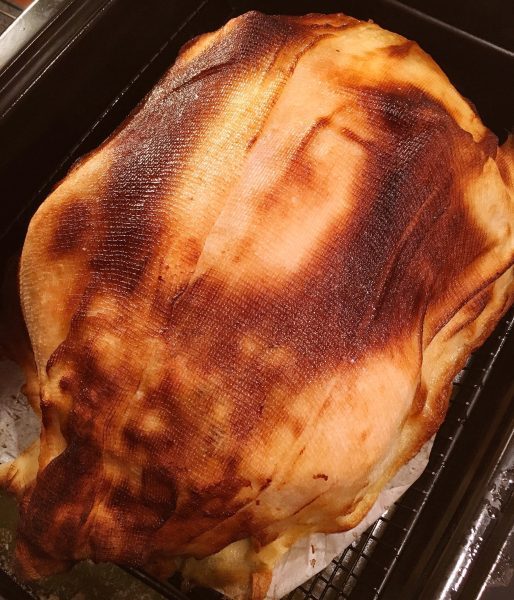
Place turkey back in the oven and continue to baste every 30 minutes. The skin will become fragile as it browns, so baste carefully. *Remember this cooking time is for a fully stuffed Turkey! An un-stuffed turkey will have less cook time.
How To Know When Your Turkey is Done!
At the fourth hour of cooking, insert an instant-read thermometer into the thickest part of the thigh. Do not poke a bone. The temperature should reach 180° (stuffing should be between 140° and 160°) and the turkey should be golden brown.
The breast meat does not need to be checked for temperature. If the legs are not fully cooked, baste the turkey, and continue cooking for another 20–30 minutes.
When fully cooked, give the “Hulk” a call, and have him come transfer Turkey to a serving platter or cutting board and let rest for at least 30 minutes. The resting time allows the juices to settle back down into the meat!
*Note you can allow the turkey to rest up to 2 hours before slicing. You will want to remove the stuffing and keep warm in a separate cooking dish.
Serving Thanksgiving Roasted Turkey
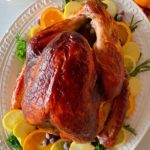
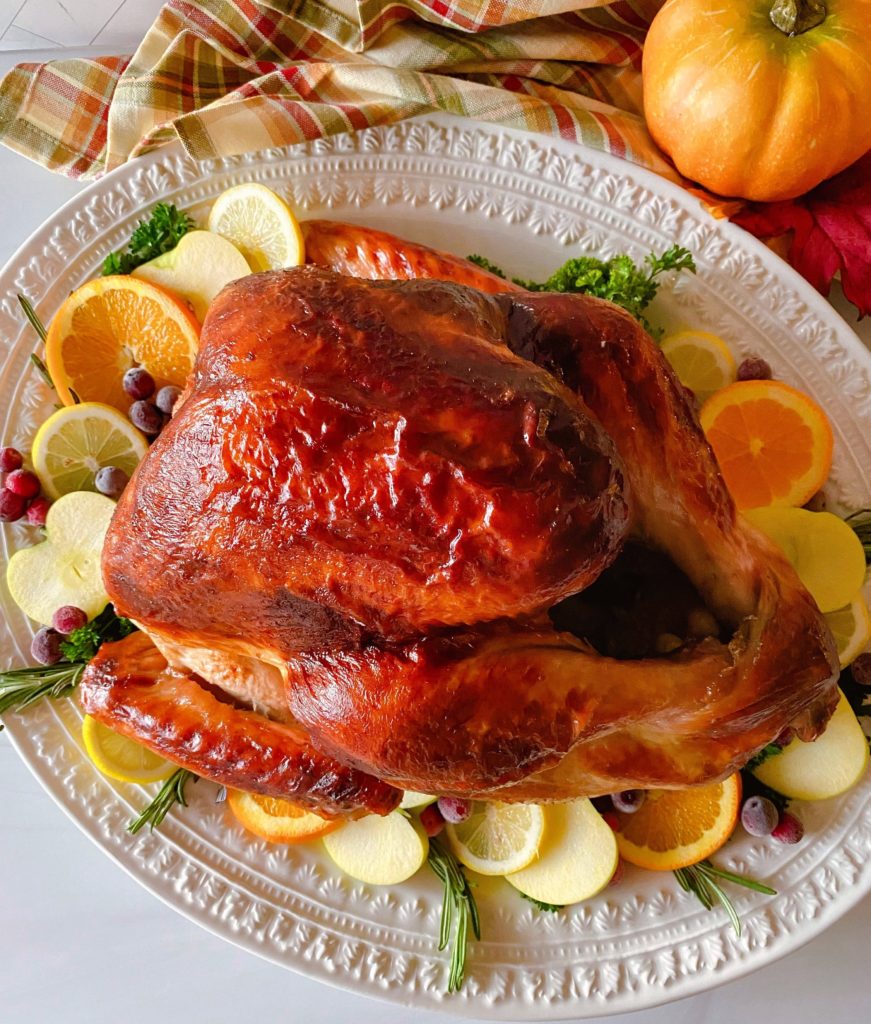
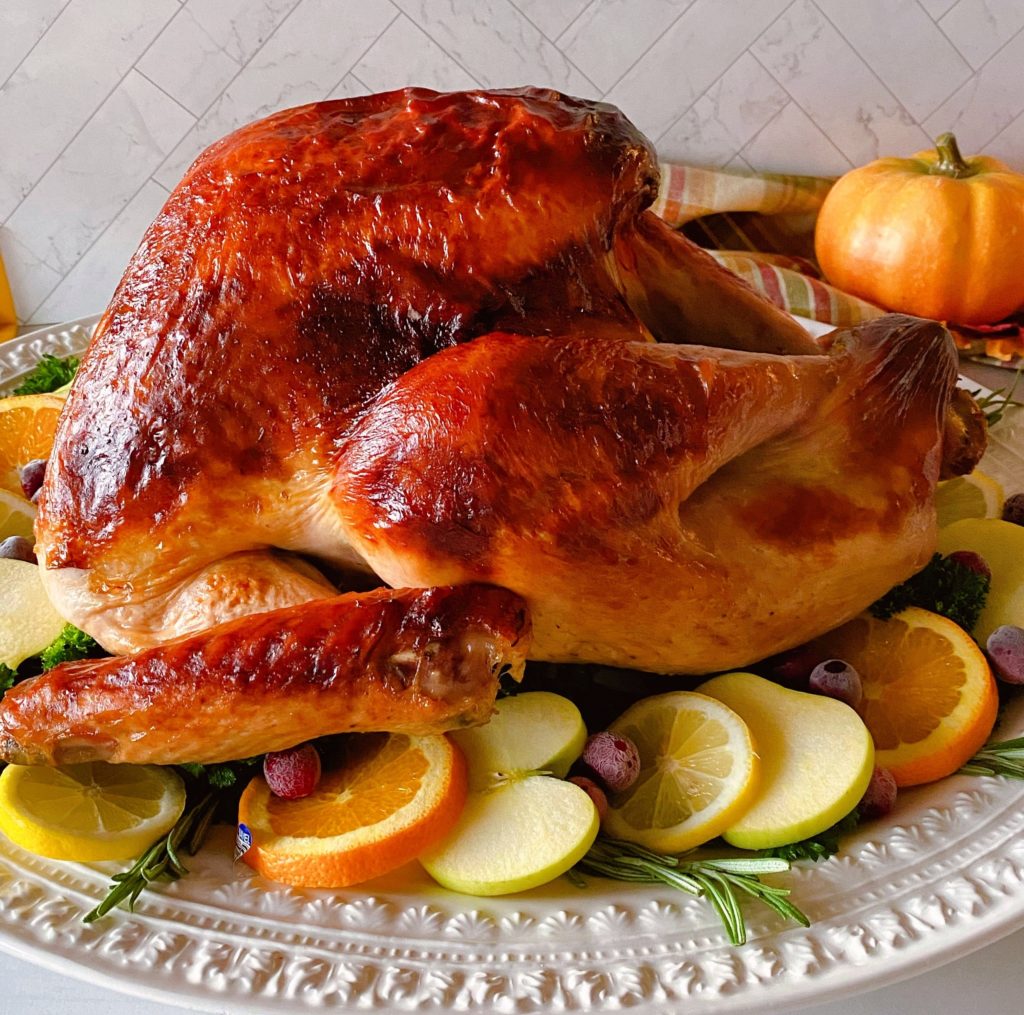
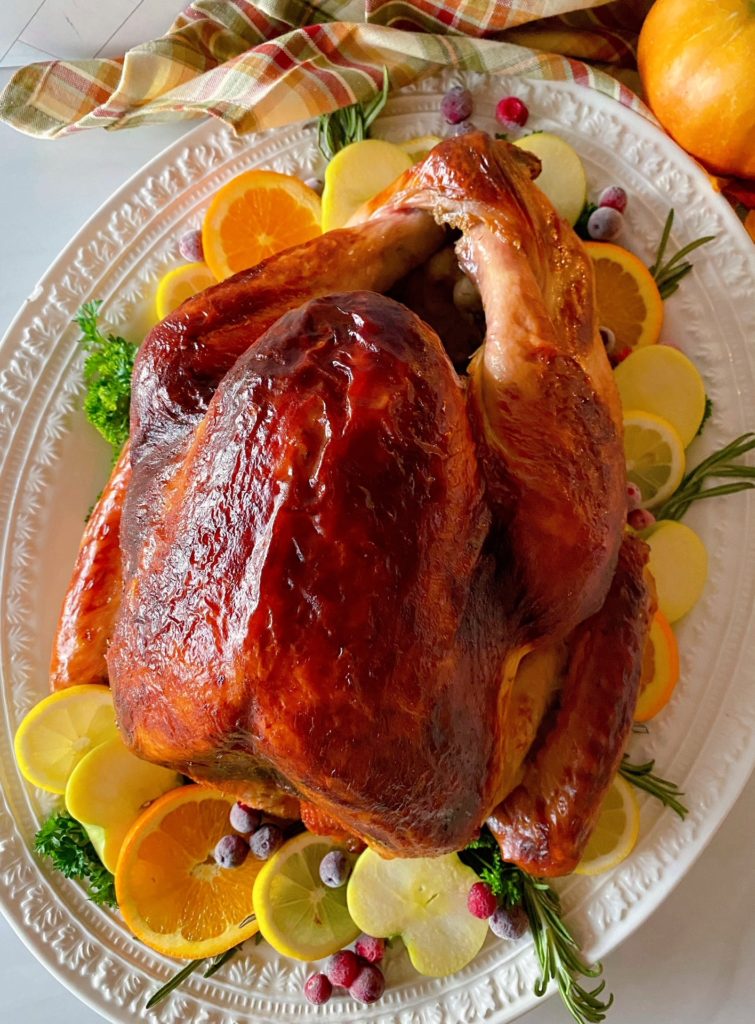
Now, to be honest, I never serve my Thanksgiving Turkey on a platter like this! It is very classic Norman Rockwell.
Mine is carved in the kitchen, carried to the table, ready to feed the starving masses gathered around my table!
It’s so much easier when feeding a crowd…and I love having my Thanksgiving table full of those I love ready to dig in!
It looks pretty though all spruced up on this platter with fruits and herbs! You can certainly garnish your oven-roasted turkey however you like.
There is just nothing better than the smell of this turkey cooking in your kitchen!
It’s truly splendid! There isn’t a better smell in all the world that can warm your heart as much as a turkey roasting.
Wish I could give each of you a taste of this luscious Turkey! I can truly say, with confidence, that I’ve never had a better Turkey in all my life, and it was worth all the failures to finally find success!
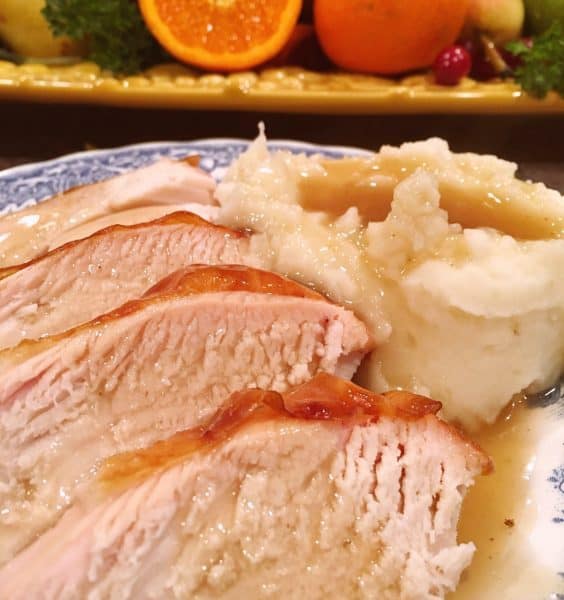
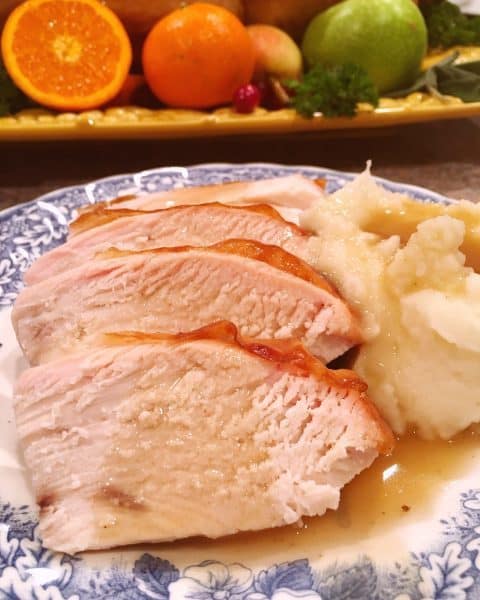
The breast meat, which tends to be dry in a lot of other Turkey recipes, is so moist it cuts with a fork and melts in your mouth!
The subtle savory explosion of complimentary flavors from the brine to the butter wine mixture is simply divine!
If you follow my step-by-step instructions, you will “WOW” your guest this Thanksgiving with the BEST Thanksgiving Turkey they’ve ever had! It is worth the extra effort. Add my scrumptious sides, including my homemade sausage stuffing and fantastic desserts… and you’ll have a feast fit for a king!
Frequently Asked Turkey Roasting Questions and Answers
- Why should I cover my Turkey during roasting? It’s best to cover a Turkey during roasting to prevent the meat from drying out. The cheesecloth allows the moisture to stay trapped inside the skin while still allowing the basting to brown the skin of the turkey.
- How long does it take to roast a Turkey? The simplest way to figure out turkey roasting times is to calculate 13 minutes per pound at 350 °F for an un-stuffed turkey or 15 minutes per pound for a stuffed turkey.
- When should I take my Turkey out of the refrigerator, or brine, before cooking? Get your turkey out of the fridge at least 30 minutes before you cook it. This will prevent less shrinkage when you place it in a hot oven.
- Can I thaw my Turkey at room temperature? No! It is not recommended because of the rapid rate at which bacteria produces on raw meat.
- Is it necessary to add water to the bottom of the pan when roasting a Turkey? No! However, because this recipe uses so much butter and wine for the basting, we highly recommend doing so. It will prevent the butter from burning as it drips into the bottom of your roasting pan, and it will help create more juices for gravy.
- How often should I baste the Turkey? Every 30 to 40 minutes. If you do it every 40 minutes, watch your cook times as the Turkey may be cooked sooner rather than later, because of the prolonged heat exposure between bastings.
- When should I cook my turkey? You should cook it at least 5–6 hours before you plan on serving it to allow for cook times and “resting” times. Just remember to remove the stuffing!
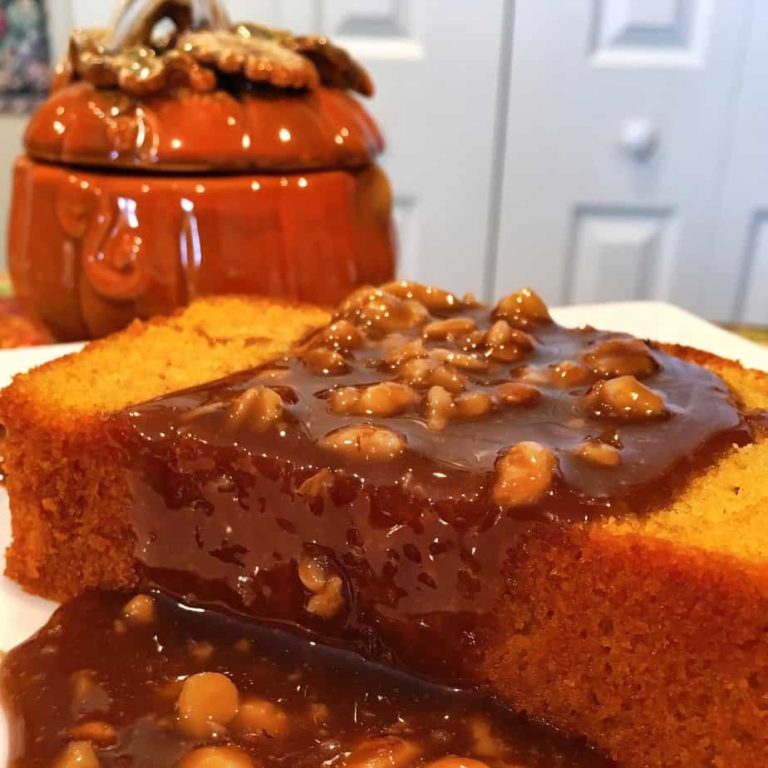
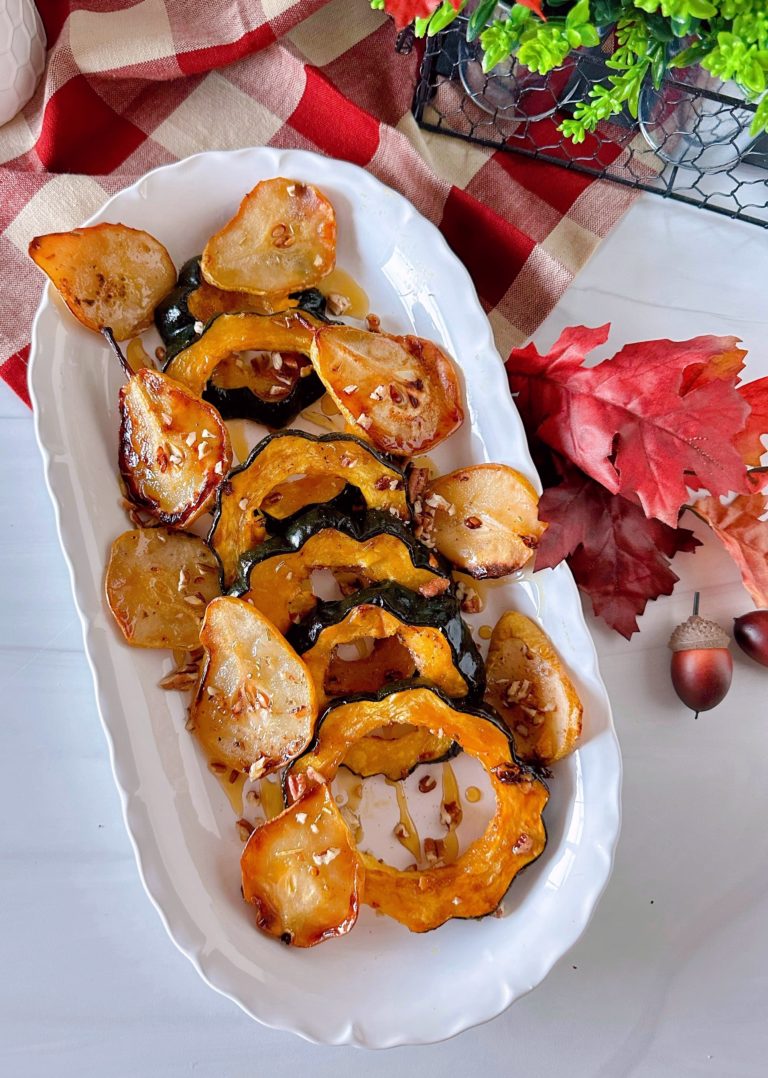
Best Thanksgiving Side Dish Recipes
- Roasted Butternut Squash Medley
- Sweet Potato Casserole
- Savory Herbed Instant Pot Mashed Potatoes
- Homemade Pan Dinner Rolls
- Fresh Green Bean Casserole
- Homemade Turkey Gravy
- Chef Johns’ Perfect Mashed Potatoes from Allrecipes.com
I hope this Holiday Season brings you Joy, Love, and Laughter around your dinning room table and that your Nest will be filled with too many blessings to count!
Thank You for Stopping by my Nest. If you have any questions, please feel free to leave a comment, and I’ll get back to you as quickly as I can.
Happy Nesting!

Printable Recipe
Best Thanksgiving Turkey
Ingredients
- 1 20-22 lb Turkey frozen, thawed with giblets and neck removed from cavity
- 6 quarts water
- 1 1/2 C. of Coarse Kosher Salt
- 2 C. Apple Cider
- 1 1/2 C. Orange Juice with or without pulp
- 2 tsp. Dried Thyme
- 2 tsp. Crushed Rosemary
- 1 1/2 Tablespoons Whole Allspice
- 1-2 Stems Fresh Sage
- Ice
- 8 Tablespoons Soften Butter
- 4 Cups of water
- 4 sticks salted butter melted
- 1 750 – ml bottle or 6 cups, dry white wine
Instructions
- In a large stock pot add 6 quarts of water and 1 1/2 cups of coarse kosher salt. Bring to a boil over high heat until salt dissolves. Add 2 Cups Apple Cider, 1 1/2 cups orange juice, dried thyme, crushed rosemary and whole allspice. stir until well mixed. Cool to room temperature.
- Remove giblets and neck from cavity of turkey. Dispose of giblets and neck. Rinse Turkey with cool water, Pat dry with clean dry cloth or paper towels.
- Place Turkey breast side down, inside a large marinating bag. Add a spring or two of sage.Place Turkey inside large ice chest. Hold bag open, and with assistance, pour brine into bag. Add more water if necessary to cover turkey. Tie bag in a knot. Cover bag with enough ice to keep cold for 12-18 hours, close ice chest, and let brine for 18 hours.
- Prepare turkey prep area with a large clean towel, heavy metal roasting pan with roasting rack, and prepared warm stuffing.
- Place bagged turkey in sink. Cut top off bag. Remove turkey and rinse well. Making sure to remove all the whole allspice.
- Place Turkey on large clean dish towel. Pat turkey dry. Turn turkey over back side up. Stuff neck cavity loosely with stuffing. Pull skin back over stuffing and pin with poultry lace pin or tie down with butcher’s twine. Carefully turn Turkey back over. Pat front of turkey dry. Stuff stomach cavity with prepared stuffing. Tie legs together.
- Lift skin on each side of Turkey breast by sliding hand between skin and breast. Place 4 Tablespoons of soften butter under skin on each side.
- Place rack on lowest level in oven. Preheat to 400°.
- In a large sauce pan, over medium heat, melt 4 sticks of butter. Add White wine. Mix. Fold a large piece of cheesecloth into quarters and cut long enough to cover length of Turkey, about 17 inches.
- Place Turkey, breast side up on a roasting rack in a heavy metal roasting pan. If the turkey comes with a pop-up timer remove it. Fold wing tips under turkey. Pour 4-6 cups of water in bottom of roasting pan.
- Place cheesecloth over Turkey, covering entire top of turkey, partially down the sides. Spoon melted butter and wine over cheesecloth. Reserving at least half the liquid for additional basting.
- Place turkey in oven and cook for 30 minutes. Using a pastry brush or baster, baste cheesecloth with butter and wine. Reduce oven temperature to 350°, and continue to baste every 30 minutes; watching pan juices. Add additional water if needed. Keeping at least 2 inches of liquid on bottom of pan at all times. DO NOT LET BUTTER BURN ON BOTTOM OF PAN. When you run out of wine and butter baste with juice from bottom of pan. Turn roasting pan every hour so Turkey cooks evenly.
- After the 3rd hour of cooking, carefully remove and discard cheesecloth. Continue to baste every 30 minutes. Skin will be fragile as it browns.
- After 4th hour of cooking, insert an instant-read thermometer into the thickest part of the thigh. Do not poke the bone. the temperature should reach 180° (Stuffing should be between 140° and 160°) and the turkey should be golden brown. The breast does not need to be checked for temperature. If legs are not fully cooked, baste Turkey, return to oven, and cook another 20-30 minutes.
- When fully cooked transfer to a serving platter or cutting board. Let rest for 30 minutes before carving. Remove stuffing and carve turkey. Be careful it will be extremely juicy.
Video
Notes
Nutrition
About the Author

Meet the Author
Hi! I’m Norine, the cook, baker, and recipe creator behind Norine’s Nest. I love sharing and creating recipes that invite family, friends, and neighbors to gather around the dinner table. Sharing good food and creating memories with those we love brings me happiness. Thanks for stopping by my Nest!

This turkey recipe turned out fantastic! I did decide to cook it a couple of days early and just took all the meat off the bones and stored it in a giant zip lock bag with the broth. Put it in the crockpot on Thanksgiving day. Son in law said it was the best turkey he had ever had and please visit us: https://www.beckandbulow.com
Beck & Bulow!
I’m beyond flattered with this review of my Turkey recipe! I love your tip to cook it ahead of time and reheat it in the crock pot. I’m also VERY impressed with your site and products! Can’t wait to try some of your amazing meats! Thank you so much for taking the time to stop by and share this review. You made my day!
Sincerely,
Norine
Do you cook the turkey in the oven or the electric roaster? Thx
Hi Stacy!
I cook my Turkey in the Oven…but use the insert from my electric roaster because I always buy the BIGGEST Turkey I can find, and it fits really well in that roasting pan! If you have any other questions please feel free to ask. This recipe is worth every single bit of effort! It is the most tender and moist Turkey EVER…and the flavor is mind blowing good!
Happy Nesting and Happy Thanksgiving!
Norine
@[email protected], hi I had to get a15 lb. The 22lb didn’t fit in the mr Rudolph roaster I ordered from Amazon. Will that change cooking times? Also how do I make the gravy? And can I use stuffing recipe and leave out the sausage? Thanks!
Hi Stacy!
Yes the cooking times will vary. If you are stuffing the Turkey be sure to cook it for 15 minutes per pound and then add about a half hour. The reason for adding time is because this recipe calls for a lot of basting and that means the oven door being open and the temp coming down and heating back up. If you have a meat thermometer test the Turkey in the thigh, not touching the bone, the internal temp should reach 165°. Stuffing can be made without the sausage. Add an extra 2-3 tablespoons of melted butter to compensate for the fat loss in the sausage. The gravy recipe is on the blog. Search under Homemade Turkey Gravy. Hope that helps. Enjoy your Thanksgiving dinner!! I just started brining my Turkey. It’s gonna be great.
Love,
Norine
Look at how amazingly moist this turkey is! The perfect recipe!
Hi Nikki!
Thanks so much my friend. You are the BEST! You can come with Julia and we’ll have a great party!
Hugs!
Norine
Your turkey looks amazing! It’s beautiful and my mouth is watering just reading all about it.
Hi Julia!
Sweet friend you are amazing! I don’t know how you do all you do and support so many friends. You are the BEST! Thanks so much for all the love and support.
Hugs!
Norine
Hi Julia!
Thanks so much my friend. Come on over for dinner! I’d love to have you and your hubs at my Thanksgiving table.
Thanks for stopping by and visiting. You ARE the BEST!
Happy Nesting!
Norine